D-Link DNS-320 User Manual - Page 41
Step 3-2, Step 4, D-Link ShareCenter Pulse User Manual,
 |
UPC - 790069347283
View all D-Link DNS-320 manuals
Add to My Manuals
Save this manual to your list of manuals |
Page 41 highlights
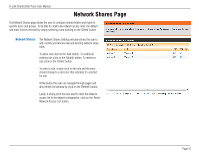
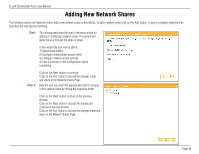
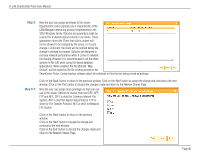
D-Link ShareCenter Pulse User Manual Step 3-2: Here the user can configure the FTP settings for this share. FTP access can be: 1) FTP Anonymous None (No Access). 2) FTP Anonymous Read Only (Limited Access). 3) FTP Anonymous Read/Write (Full Access). Click on the 'Back' button to return to the previous window. Click on the 'Next' button to accept the change and continue to the next window. Click on the 'Exit' button to discard the changes made and return to the Network Shares Page. Step 4: Here the user view a summary of the share created. Click on the 'Back' button to return to the previous window. Click on the 'Completed' button to accept the change and complete the wizard. Click on the 'Exit' button to discard the changes made and return to the Network Shares Page. Page 41
-
 1
1 -
2
-
3
-
4
-
5
-
6
-
7
-
8
-
9
-
10
-
11
-
12
-
13
-
14
-
15
-
16
-
17
-
18
-
19
-
20
-
21
-
22
-
23
-
24
-
25
-
26
-
27
-
28
-
29
-
30
-
31
-
32
-
33
-
34
-
35
-
 36
36 -
 37
37 -
 38
38 -
 39
39 -
 40
40 -
 41
41 -
 42
42 -
 43
43 -
 44
44 -
 45
45 -
 46
46 -
47
-
48
-
49
-
50
-
51
-
52
-
53
-
54
-
55
-
56
-
57
-
58
-
59
-
60
-
61
-
62
-
63
-
64
-
65
-
66
-
67
-
68
-
69
-
70
-
71
-
72
-
73
-
74
-
75
-
76
-
77
-
78
-
79
-
80
-
81
-
82
-
83
-
84
-
85
-
86
-
87
-
88
-
89
-
90
-
91
-
92
-
93
-
94
-
95
-
96
-
97
-
98
-
99
 |
 |