Dell 2145 Color Laser User's Guide - Page 46
Receiving in secure receiving mode, Receiving faxes in memory, Other ways to fax
 |
View all Dell 2145 Color Laser manuals
Add to My Manuals
Save this manual to your list of manuals |
Page 46 highlights
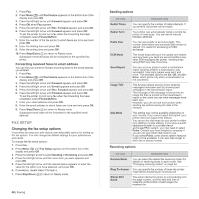
• DRPD must be set up again if you re-assign your fax number, or connect the printer to another telephone line. • After DRPD has been set up, call your fax number again to verify that the printer answers with a fax tone. Then have a call placed to a different number assigned to that same line to be sure the call is forwarded to the extension telephone or answering printer plugged into the EXT socket. Receiving in secure receiving mode You may need to prevent your received faxes from being accessed by unauthorized people. You can turn on secure receiving mode to restrict printing of received faxes when the printer is unattended. In secure receiving mode, all incoming faxes go into memory. When the mode is deactivated, any stored faxes are printed. Activating secure receiving mode 1. Press Fax. 2. Press Menu ( ) and then press OK when Fax Feature appears on the bottom line of the display. 3. Press the left/right arrow until Secure Receive appears and press OK. 4. Press the left/right arrow until On appears and press OK. 5. Enter a four-digit password you want to use and press OK. You can activate secure receiving mode without setting a password, but cannot protect your faxes. 6. Re-enter the password to confirm it and press OK. 7. Press Stop/Clear ( ) to return to Ready mode. When a fax is received in secure receiving mode, your printer stores it in memory and shows Secure Receive to let you know that there is a fax received. Printing received faxes 1. Access the Secure Receive menu by following steps 1 through 3 in "Activating secure receiving mode." 2. Press the left/right arrow until Print appears and press OK. 3. Enter the four-digit password and press OK. The printer prints all of the faxes stored in memory. Deactivating secure receiving mode 1. Access the Secure Receive menu by following steps 1 through 3 in "Activating secure receiving mode." 2. Press the left/right arrow until Off appears and press OK. 3. Enter the four-digit password and press OK. The mode is deactivated and the printer prints all faxes stored in memory. 4. Press Stop/Clear ( ) to return to Ready mode. Receiving faxes in memory Since your printer is a multi-tasking device, it can receive faxes while you are making copies or printing. If you receive a fax while you are copying or printing, your printer stores incoming faxes in its memory. Then, as soon as you finish copying or printing, the printer automatically prints the fax. Also, your printer receives faxes and stores them in its memory when there is no paper in the tray or no toner in the installed toner cartridge. 46 | Faxing OTHER WAYS TO FAX Sending a fax to multiple destinations You can use the Multiple Send feature, which allows you to send a fax to multiple locations. Originals are automatically stored in memory and sent to a remote station. After transmission, the originals are automatically erased from memory. You cannot send a color fax using this feature. 1. Press Fax. 2. Load originals face up into the DADF, or place a single original face down on the scanner glass. For details about loading an original, see "Loading originals" on page 23. 3. Adjust the document resolution and darkness to suit your fax needs. See "Adjusting the document settings" on page 43. 4. Press Menu ( ) until Fax Feature appears on the bottom line of the display and press OK. 5. Press the left/right arrow until Multi Send appears and press OK. 6. Enter the number of the first receiving fax printer and press OK. You can use speed buttons, speed dial numbers. You can enter Group Dial Number using Address Book Button. For details, see "Setting up address book" on page 49. 7. Enter the second fax number and press OK. The display asks you to enter another fax number to send the document. 8. To enter more fax numbers, press OK when Yes appears and repeat steps 6 and 7. You can add up to 10 destinations. Once you entered a group dial number, you cannot enter another group dial numbers anymore. 9. When you have finished entering fax numbers, press the left/right arrow to select No at the Another No.? prompt and press OK. The original is scanned into memory before transmission. The display shows memory capacity and the number of pages being stored in memory. 10. If an original is placed on the scanner glass, select Yes to add another pages. Load another original and press OK. When you have finished, select No at the Another Page? prompt. The printer begins sending the fax to the numbers you entered in the order in which you entered them. Sending a delayed fax You can set your printer to send a fax at a later time when you will not be present. You cannot send a color fax using this feature. 1. Press Fax. 2. Load originals face up into the DADF, or place a single original face down on the scanner glass. For details about loading an original, see "Loading originals" on page 23. 3. Adjust the document resolution and darkness to suit your fax needs. See "Adjusting the document settings" on page 43. 4. Press Menu ( ) until Fax Feature appears on the bottom line of the display and press OK. 5. Press the left/right arrow until Delay Send appears and press OK. 6. Enter the number of the receiving printer using the number keypad. You can use speed buttons, speed dial numbers. You can enter Group Dial Number using Address Book Button.For details. See "Setting up address book" on page 49.
-
 1
1 -
2
-
3
-
4
-
5
-
6
-
7
-
8
-
9
-
10
-
11
-
12
-
13
-
14
-
15
-
16
-
17
-
18
-
19
-
20
-
21
-
22
-
23
-
24
-
25
-
26
-
27
-
28
-
29
-
30
-
31
-
32
-
33
-
34
-
35
-
36
-
37
-
38
-
39
-
40
-
 41
41 -
 42
42 -
 43
43 -
 44
44 -
 45
45 -
 46
46 -
 47
47 -
 48
48 -
 49
49 -
 50
50 -
 51
51 -
52
-
53
-
54
-
55
-
56
-
57
-
58
-
59
-
60
-
61
-
62
-
63
-
64
-
65
-
66
-
67
-
68
-
69
-
70
-
71
-
72
-
73
-
74
-
75
-
76
-
77
-
78
-
79
-
80
-
81
-
82
-
83
-
84
-
85
-
86
-
87
-
88
-
89
-
90
-
91
-
92
-
93
-
94
-
95
-
96
-
97
-
98
-
99
-
100
-
101
-
102
-
103
-
104
-
105
-
106
-
107
-
108
-
109
-
110
-
111
-
112
-
113
-
114
-
115
-
116
-
117
-
118
-
119
-
120
-
121
-
122
-
123
-
124
-
125
-
126
-
127
-
128
-
129
-
130
-
131
-
132
-
133
-
134
-
135
-
136
-
137
-
138
-
139
-
140
-
141
 |
 |