Dell 2145 Color Laser User's Guide - Page 68
In the paper exit area
 |
View all Dell 2145 Color Laser manuals
Add to My Manuals
Save this manual to your list of manuals |
Page 68 highlights
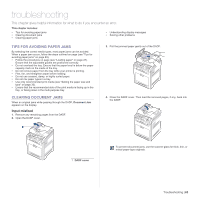
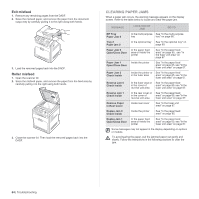
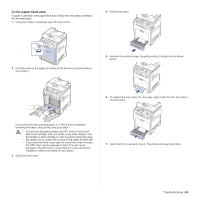
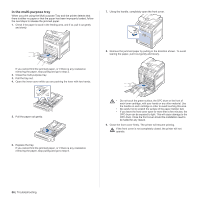
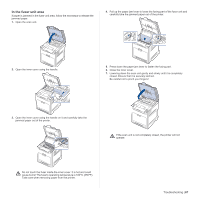
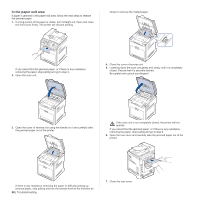
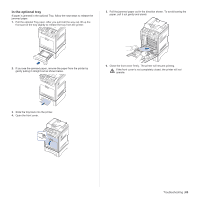
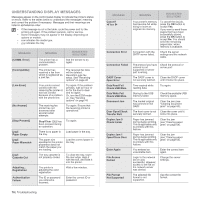
In the paper exit area If paper is jammed in the paper exit area, follow the next steps to release the jammed paper. 1. If a long portion of the paper is visible, pull it straight out. Open and close the front cover firmly. The printer will resume printing. shown to remove the misfed paper. If you cannot find the jammed paper, or if there is any resistance removing the paper, stop pulling and go to step 2. 2. Open the scan unit. 4. Close the cover of reverse unit. 5. Lowering down the scan unit gently and slowly until it is completely closed. Ensure that it is securely latched. Be careful not to pinch your fingers! 3. Open the cover of reverse unit using the handle on it and carefully take the jammed paper out of the printer. If the scan unit is not completely closed, the printer will not operate. If you cannot find the jammed paper, or if there is any resistance removing the paper, stop pulling and go to step 6. 6. Open the rear cover and carefully take the jammed paper out of the printer. If there is any resistance removing the paper or difficulty picking up jammed paper, stop pulling and turn the release knob to the direction as 68 | Troubleshooting 7. Close the rear cover.
-
 1
1 -
2
-
3
-
4
-
5
-
6
-
7
-
8
-
9
-
10
-
11
-
12
-
13
-
14
-
15
-
16
-
17
-
18
-
19
-
20
-
21
-
22
-
23
-
24
-
25
-
26
-
27
-
28
-
29
-
30
-
31
-
32
-
33
-
34
-
35
-
36
-
37
-
38
-
39
-
40
-
41
-
42
-
43
-
44
-
45
-
46
-
47
-
48
-
49
-
50
-
51
-
52
-
53
-
54
-
55
-
56
-
57
-
58
-
59
-
60
-
61
-
62
-
 63
63 -
 64
64 -
 65
65 -
 66
66 -
 67
67 -
 68
68 -
 69
69 -
 70
70 -
 71
71 -
 72
72 -
 73
73 -
74
-
75
-
76
-
77
-
78
-
79
-
80
-
81
-
82
-
83
-
84
-
85
-
86
-
87
-
88
-
89
-
90
-
91
-
92
-
93
-
94
-
95
-
96
-
97
-
98
-
99
-
100
-
101
-
102
-
103
-
104
-
105
-
106
-
107
-
108
-
109
-
110
-
111
-
112
-
113
-
114
-
115
-
116
-
117
-
118
-
119
-
120
-
121
-
122
-
123
-
124
-
125
-
126
-
127
-
128
-
129
-
130
-
131
-
132
-
133
-
134
-
135
-
136
-
137
-
138
-
139
-
140
-
141
 |
 |
