Dell 5100MP User Guide - Page 27
User Color, Color Setting, Enter - projector manual
 |
UPC - 884116003892
View all Dell 5100MP manuals
Add to My Manuals
Save this manual to your list of manuals |
Page 27 highlights
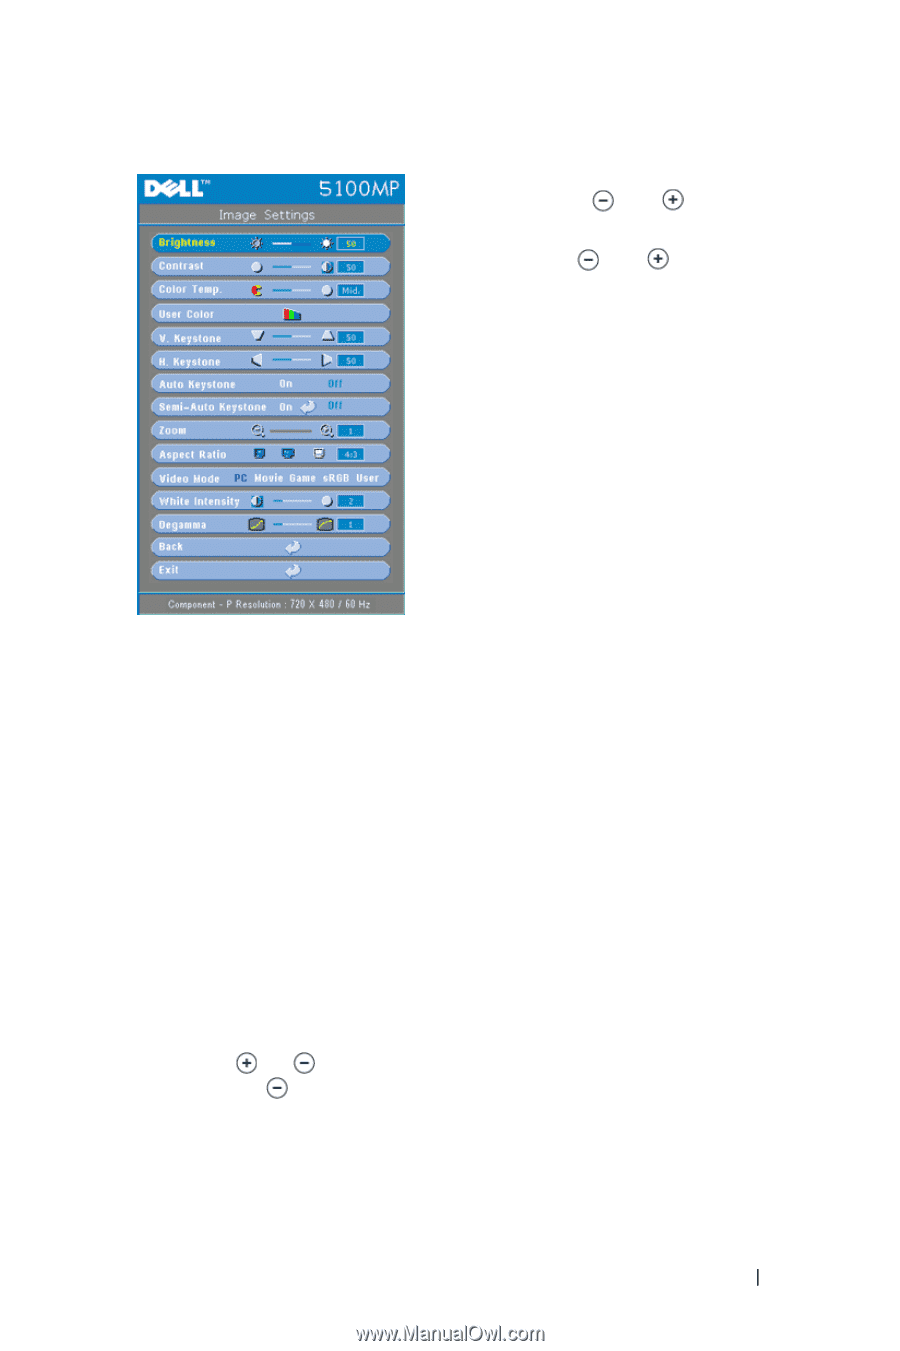
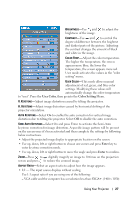
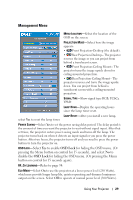
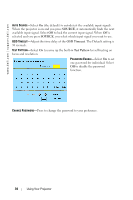
BRIGHTNESS-Use and to adjust the brightness of the image. CONTRAST-Use and to control the degree of difference between the brightest and darkest parts of the picture. Adjusting the contrast changes the amount of black and white in the image. COLOR TEMP.-Adjust the color temperature. The higher the temperature, the screen appears more blue; the lower the temperature, the screen appears more red. User mode activates the values in the "color setting" menu. USER COLOR-This mode allows manual adjustment of red, green, and blue color settings. Modifying these values will automatically change the color temperature to "user". Press the User Color, then go into the Color Setting Menu. V. KEYSTONE-Adjust image distortion caused by tilting the projector. H. KEYSTONE-Adjust image distortion caused by horizontal shifting of the projector orientation. AUTO KEYSTONE-Select On to enable the auto correction for vertical image distortion due to tilting the projector. Select Off to disable the auto correction. SEMI-AUTO KEYSTONE-Select On and press Enter to activate the Semi-Auto keystone correction for image distortion. A specific image pattern will be present on the screen once it's been activated and then complete the settings by following below instructions. • Adjust the projected image display to appropriate location on the screen. • Use up, down, left or right button to choose one corner and press Enter key to enter keystone correction mode. • Use up, down, left or right button to move the angle and press Enter to confirm. ZOOM-Press to digitally magnify an image to 10 times on the projection screen and press to reduce the zoomed image. ASPECT RATIO-Select an aspect ratio to adjust how the image appears. • 1:1 - The input source displays without scaling. Use 1:1 aspect ratio if you are using one of the following: - VGA cable and the computer has a resolution less than SXGA+ (1400 x 1050) Using Your Projector 27
-
 1
1 -
2
-
3
-
4
-
5
-
6
-
7
-
8
-
9
-
10
-
11
-
12
-
13
-
14
-
15
-
16
-
17
-
18
-
19
-
20
-
21
-
 22
22 -
 23
23 -
 24
24 -
 25
25 -
 26
26 -
 27
27 -
 28
28 -
 29
29 -
 30
30 -
 31
31 -
 32
32 -
33
-
34
-
35
-
36
-
37
-
38
-
39
-
40
-
41
-
42
-
43
-
44
-
45
-
46
-
47
-
48
-
49
-
50
-
51
-
52
-
53
-
54
-
55
-
56
-
57
-
58
-
59
-
60
-
61
 |
 |