Dell AX4-5 Hardware Installation Guide - Page 44
Assigning the Virtual Disks to Cluster Nodes, Advanced or Optional Storage Features - virtual disk best practice
 |
View all Dell AX4-5 manuals
Add to My Manuals
Save this manual to your list of manuals |
Page 44 highlights
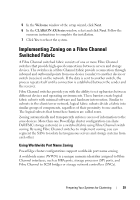
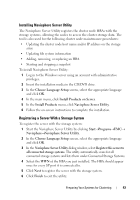
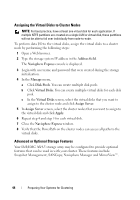
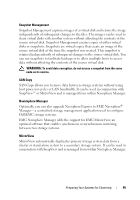
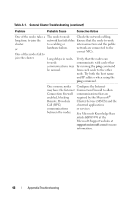
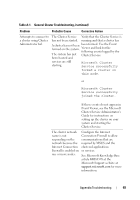
Assigning the Virtual Disks to Cluster Nodes NOTE: For best practice, have at least one virtual disk for each application. If multiple NTFS partitions are created on a single LUN or virtual disk, these partitions will not be able to fail over individually from node-to-node. To perform data I/O to the virtual disks, assign the virtual disks to a cluster node by performing the following steps: 1 Open a Web browser. 2 Type the storage system IP address in the Address field. The Navisphere Express console is displayed. 3 Login with user name and password that were created during the storage initialization. 4 In the Manage menu, a Click Disk Pools. You can create multiple disk pools. b Click Virtual Disks. You can create multiple virtual disks for each disk pool. c In the Virtual Disks screen, select the virtual disks that you want to assign to the cluster node and click Assign Server. 5 In Assign Server screen, select the cluster nodes that you want to assign to the virtual disk and click Apply. 6 Repeat step 4 and step 5 for each virtual disk. 7 Close the Navisphere Express window. 8 Verify that the PowerPath on the cluster nodes can access all paths to the virtual disks. Advanced or Optional Storage Features Your Dell/EMC AX4-5 storage array may be configured to provide optional features that can be used in with your cluster. These features include Snapshot Management, SANCopy, Navisphere Manager and MirrorView™. 44 Preparing Your Systems for Clustering
-
 1
1 -
2
-
3
-
4
-
5
-
6
-
7
-
8
-
9
-
10
-
11
-
12
-
13
-
14
-
15
-
16
-
17
-
18
-
19
-
20
-
21
-
22
-
23
-
24
-
25
-
26
-
27
-
28
-
29
-
30
-
31
-
32
-
33
-
34
-
35
-
36
-
37
-
38
-
 39
39 -
 40
40 -
 41
41 -
 42
42 -
 43
43 -
 44
44 -
 45
45 -
 46
46 -
 47
47 -
 48
48 -
 49
49 -
50
-
51
-
52
-
53
-
54
-
55
-
56
-
57
-
58
-
59
-
60
 |
 |