Dell C1765NFW Dell Users Guide - Page 150
Date & Time, Paper Density, Apply New Settings
 |
View all Dell C1765NFW manuals
Add to My Manuals
Save this manual to your list of manuals |
Page 150 highlights
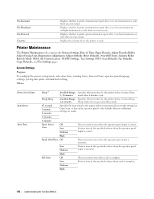
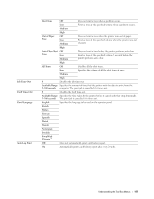
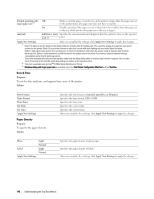
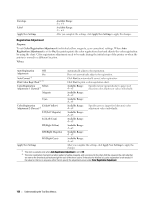
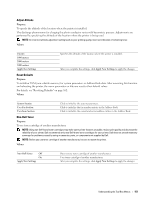
Disable printing with Off larger paper size*3 Prints even if the paper set in the tray of the printer is larger than the paper size set in the printer driver (the paper size does not have to match). On Disables printing if the paper size set in the printer driver differs from the paper set in the tray of the printer (the paper set in the tray is larger). mm/inch millimeter (mm) Specifies the measurement unit displayed after the numeric value on the operator inch (") panel. Apply New Settings After you complete the settings, click Apply New Settings to apply the changes. *1 Enter 5 in Sleep to put the printer in the Sleep mode five minutes after it finishes a job. This uses less energy, but requires more warmup time for the printer. Enter 5 if your printer shares an electrical circuit with room lighting and you notice lights flickering. Select a high value if your printer is in constant use. In most circumstances, this keeps the printer ready to operate with minimum warm-up time. Select a value between 5 and 30 minutes for the power saver timer mode if you want a balance between energy consumption and a shorter warm-up period. The printer automatically returns to the standby mode from the Sleep mode when it receives data from the computer. You can also return the printer to the standby mode by pressing any button on the operator panel. *2 This item is available only for DellTM C1765nf Color Multifunction Printer. *3 Disable printing with larger paper size is available only in the Dell Printer Configuration Web Tool and the Tool Box. Date & Time Purpose: To set the date and time, and regional time zone of the printer. Values: Date Format Time Format Time Zone Set Date Set Time Apply New Settings Paper Density Purpose: To specify the paper density. Values: Specifies the date format; yy/mm/dd, mm/dd/yy, or dd/mm/yy. Specifies the time format; 12H or 24H. Specifies the time zone. Specifies the current date. Specifies the current time. After you complete the settings, click Apply New Settings to apply the changes. Plain Label Apply New Settings Light Normal Light Normal Specifies the paper density of plain paper. Specifies the paper density of labels. After you complete the settings, click Apply New Settings to apply the changes. 148 Understanding the Tool Box Menus
-
 1
1 -
2
-
3
-
4
-
5
-
6
-
7
-
8
-
9
-
10
-
11
-
12
-
13
-
14
-
15
-
16
-
17
-
18
-
19
-
20
-
21
-
22
-
23
-
24
-
25
-
26
-
27
-
28
-
29
-
30
-
31
-
32
-
33
-
34
-
35
-
36
-
37
-
38
-
39
-
40
-
41
-
42
-
43
-
44
-
45
-
46
-
47
-
48
-
49
-
50
-
51
-
52
-
53
-
54
-
55
-
56
-
57
-
58
-
59
-
60
-
61
-
62
-
63
-
64
-
65
-
66
-
67
-
68
-
69
-
70
-
71
-
72
-
73
-
74
-
75
-
76
-
77
-
78
-
79
-
80
-
81
-
82
-
83
-
84
-
85
-
86
-
87
-
88
-
89
-
90
-
91
-
92
-
93
-
94
-
95
-
96
-
97
-
98
-
99
-
100
-
101
-
102
-
103
-
104
-
105
-
106
-
107
-
108
-
109
-
110
-
111
-
112
-
113
-
114
-
115
-
116
-
117
-
118
-
119
-
120
-
121
-
122
-
123
-
124
-
125
-
126
-
127
-
128
-
129
-
130
-
131
-
132
-
133
-
134
-
135
-
136
-
137
-
138
-
139
-
140
-
141
-
142
-
143
-
144
-
 145
145 -
 146
146 -
 147
147 -
 148
148 -
 149
149 -
 150
150 -
 151
151 -
 152
152 -
 153
153 -
 154
154 -
 155
155 -
156
-
157
-
158
-
159
-
160
-
161
-
162
-
163
-
164
-
165
-
166
-
167
-
168
-
169
-
170
-
171
-
172
-
173
-
174
-
175
-
176
-
177
-
178
-
179
-
180
-
181
-
182
-
183
-
184
-
185
-
186
-
187
-
188
-
189
-
190
-
191
-
192
-
193
-
194
-
195
-
196
-
197
-
198
-
199
-
200
-
201
-
202
-
203
-
204
-
205
-
206
-
207
-
208
-
209
-
210
-
211
-
212
-
213
-
214
-
215
-
216
-
217
-
218
-
219
-
220
-
221
-
222
-
223
-
224
-
225
-
226
-
227
-
228
-
229
-
230
-
231
-
232
-
233
-
234
-
235
-
236
-
237
-
238
-
239
-
240
-
241
-
242
-
243
-
244
-
245
-
246
-
247
-
248
-
249
-
250
-
251
-
252
-
253
-
254
-
255
-
256
-
257
-
258
-
259
-
260
-
261
-
262
-
263
-
264
-
265
-
266
-
267
-
268
-
269
-
270
-
271
-
272
-
273
-
274
-
275
-
276
-
277
-
278
-
279
-
280
-
281
-
282
-
283
-
284
-
285
-
286
-
287
-
288
-
289
-
290
-
291
-
292
-
293
-
294
-
295
-
296
-
297
-
298
-
299
-
300
-
301
-
302
-
303
-
304
-
305
-
306
-
307
-
308
-
309
-
310
-
311
-
312
-
313
-
314
-
315
-
316
-
317
-
318
-
319
-
320
-
321
-
322
-
323
-
324
-
325
-
326
-
327
-
328
-
329
-
330
-
331
-
332
-
333
-
334
-
335
-
336
-
337
-
338
-
339
-
340
-
341
-
342
-
343
-
344
-
345
-
346
-
347
-
348
-
349
-
350
-
351
-
352
-
353
-
354
-
355
-
356
-
357
-
358
-
359
-
360
-
361
-
362
-
363
-
364
-
365
-
366
-
367
-
368
-
369
-
370
-
371
-
372
-
373
-
374
-
375
-
376
 |
 |