Dell C1765NFW Dell Users Guide - Page 153
Adjust Altitude, Reset Defaults, Non-Dell Toner, meter, Apply New Settings, System
 |
View all Dell C1765NFW manuals
Add to My Manuals
Save this manual to your list of manuals |
Page 153 highlights
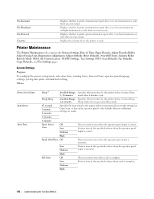
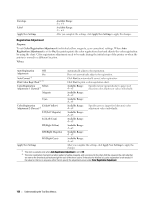
Adjust Altitude Purpose: To specify the altitude of the location where the printer is installed. The discharge phenomenon for charging the photo conductor varies with barometric pressure. Adjustments are performed by specifying the altitude of the location where the printer is being used. NOTE: An incorrect altitude adjustment setting leads to poor printing quality, incorrect indication of remaining toner. Values: 0 meter 1000 meters 2000 meters 3000 meters Apply New Settings Specifies the altitude of the location where the printer is installed. After you complete the settings, click Apply New Settings to apply the changes. Reset Defaults Purpose: To initialize NVM (non-volatile memory) for system parameters or Address Book data. After executing this function and rebooting the printer, the menu parameters or data are reset to their default values. For details, see "Resetting Defaults" on page 162. Values: System Section User Fax Section User Scan Section Click to initialize the system parameters. Click to initialize the fax number entries in the Address Book. Click to initialize the e-mail and server address entries in the Address Book. Non-Dell Toner Purpose: To use toner cartridge of another manufacturer. NOTE: Using non-Dell-brand toner cartridges may make some printer features unusable, reduce print quality and decrease the reliability of your printer. Dell recommends only new Dell-brand toner cartridges for your printer. Dell does not provide warranty coverage for problems caused by using accessories, parts, or components not supplied by Dell. NOTE: Before you use toner cartridge of another manufacturer, be sure to restart the printer. Values: Non-Dell Toner Off On Apply New Settings Does not use toner cartridge of another manufacturer. Uses toner cartridge of another manufacturer. After you complete the settings, click Apply New Settings to apply the changes. Understanding the Tool Box Menus 151
-
 1
1 -
2
-
3
-
4
-
5
-
6
-
7
-
8
-
9
-
10
-
11
-
12
-
13
-
14
-
15
-
16
-
17
-
18
-
19
-
20
-
21
-
22
-
23
-
24
-
25
-
26
-
27
-
28
-
29
-
30
-
31
-
32
-
33
-
34
-
35
-
36
-
37
-
38
-
39
-
40
-
41
-
42
-
43
-
44
-
45
-
46
-
47
-
48
-
49
-
50
-
51
-
52
-
53
-
54
-
55
-
56
-
57
-
58
-
59
-
60
-
61
-
62
-
63
-
64
-
65
-
66
-
67
-
68
-
69
-
70
-
71
-
72
-
73
-
74
-
75
-
76
-
77
-
78
-
79
-
80
-
81
-
82
-
83
-
84
-
85
-
86
-
87
-
88
-
89
-
90
-
91
-
92
-
93
-
94
-
95
-
96
-
97
-
98
-
99
-
100
-
101
-
102
-
103
-
104
-
105
-
106
-
107
-
108
-
109
-
110
-
111
-
112
-
113
-
114
-
115
-
116
-
117
-
118
-
119
-
120
-
121
-
122
-
123
-
124
-
125
-
126
-
127
-
128
-
129
-
130
-
131
-
132
-
133
-
134
-
135
-
136
-
137
-
138
-
139
-
140
-
141
-
142
-
143
-
144
-
145
-
146
-
147
-
 148
148 -
 149
149 -
 150
150 -
 151
151 -
 152
152 -
 153
153 -
 154
154 -
 155
155 -
 156
156 -
 157
157 -
 158
158 -
159
-
160
-
161
-
162
-
163
-
164
-
165
-
166
-
167
-
168
-
169
-
170
-
171
-
172
-
173
-
174
-
175
-
176
-
177
-
178
-
179
-
180
-
181
-
182
-
183
-
184
-
185
-
186
-
187
-
188
-
189
-
190
-
191
-
192
-
193
-
194
-
195
-
196
-
197
-
198
-
199
-
200
-
201
-
202
-
203
-
204
-
205
-
206
-
207
-
208
-
209
-
210
-
211
-
212
-
213
-
214
-
215
-
216
-
217
-
218
-
219
-
220
-
221
-
222
-
223
-
224
-
225
-
226
-
227
-
228
-
229
-
230
-
231
-
232
-
233
-
234
-
235
-
236
-
237
-
238
-
239
-
240
-
241
-
242
-
243
-
244
-
245
-
246
-
247
-
248
-
249
-
250
-
251
-
252
-
253
-
254
-
255
-
256
-
257
-
258
-
259
-
260
-
261
-
262
-
263
-
264
-
265
-
266
-
267
-
268
-
269
-
270
-
271
-
272
-
273
-
274
-
275
-
276
-
277
-
278
-
279
-
280
-
281
-
282
-
283
-
284
-
285
-
286
-
287
-
288
-
289
-
290
-
291
-
292
-
293
-
294
-
295
-
296
-
297
-
298
-
299
-
300
-
301
-
302
-
303
-
304
-
305
-
306
-
307
-
308
-
309
-
310
-
311
-
312
-
313
-
314
-
315
-
316
-
317
-
318
-
319
-
320
-
321
-
322
-
323
-
324
-
325
-
326
-
327
-
328
-
329
-
330
-
331
-
332
-
333
-
334
-
335
-
336
-
337
-
338
-
339
-
340
-
341
-
342
-
343
-
344
-
345
-
346
-
347
-
348
-
349
-
350
-
351
-
352
-
353
-
354
-
355
-
356
-
357
-
358
-
359
-
360
-
361
-
362
-
363
-
364
-
365
-
366
-
367
-
368
-
369
-
370
-
371
-
372
-
373
-
374
-
375
-
376
 |
 |