Dell CX4 Troubleshooting Guide - Page 50
Create Storage Group, Access Control Enabled
 |
View all Dell CX4 manuals
Add to My Manuals
Save this manual to your list of manuals |
Page 50 highlights
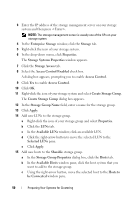
3 Enter the IP address of the storage management server on your storage system and then press . NOTE: The storage management server is usually one of the SPs on your storage system. 4 In the Enterprise Storage window, click the Storage tab. 5 Right-click the icon of your storage system. 6 In the drop-down menu, click Properties. The Storage Systems Properties window appears. 7 Click the Storage Access tab. 8 Select the Access Control Enabled check box. A dialog box appears, prompting you to enable Access Control. 9 Click Yes to enable Access Control. 10 Click OK. 11 Right-click the icon of your storage system and select Create Storage Group. The Create Storage Group dialog box appears. 12 In the Storage Group Name field, enter a name for the storage group. 13 Click Apply. 14 Add new LUNs to the storage group. a Right-click the icon of your storage group and select Properties. b Click the LUNs tab. c In the Available LUNs window, click an available LUN. d Click the right-arrow button to move the selected LUN to the Selected LUNs pane. e Click Apply. 15 Add new hosts to the Sharable storage group. a In the Storage Group Properties dialog box, click the Hosts tab. b In the Available Hosts window pane, click the host system that you want to add to the storage group. c Using the right-arrow button, move the selected host to the Hosts to be Connected window pane. 50 Preparing Your Systems for Clustering
-
 1
1 -
2
-
3
-
4
-
5
-
6
-
7
-
8
-
9
-
10
-
11
-
12
-
13
-
14
-
15
-
16
-
17
-
18
-
19
-
20
-
21
-
22
-
23
-
24
-
25
-
26
-
27
-
28
-
29
-
30
-
31
-
32
-
33
-
34
-
35
-
36
-
37
-
38
-
39
-
40
-
41
-
42
-
43
-
44
-
 45
45 -
 46
46 -
 47
47 -
 48
48 -
 49
49 -
 50
50 -
 51
51 -
 52
52 -
 53
53 -
 54
54 -
 55
55 -
56
-
57
-
58
-
59
-
60
-
61
-
62
-
63
-
64
-
65
-
66
-
67
-
68
 |
 |