Dell Inspiron 1526 Owner's Manual - Page 153
Broadcom® Media PC Card, Internal Card With Bluetooth® Wireless Technology, Removing the Card
 |
View all Dell Inspiron 1526 manuals
Add to My Manuals
Save this manual to your list of manuals |
Page 153 highlights
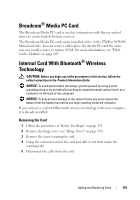
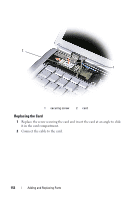
Broadcom® Media PC Card The Broadcom Media PC card is used in conjunction with blu-ray optical drives to render high definition content. The Broadcom Media PC card can be installed either in the UWB or WWAN Mini-Card slots. You can remove and replace the Media PC card the same way you would remove or replace FCM. For more information, see "Flash Cache Module" on page 149. Internal Card With Bluetooth® Wireless Technology CAUTION: Before you begin any of the procedures in this section, follow the safety instructions in the Product Information Guide. NOTICE: To avoid electrostatic discharge, ground yourself by using a wrist grounding strap or by periodically touching an unpainted metal surface (such as a connector on the back of the computer). NOTICE: To help prevent damage to the system board, you must remove the battery from the battery bay before you begin working inside the computer. If you ordered a card with Bluetooth wireless technology with your computer, it is already installed. Removing the Card 1 Follow the procedures in "Before You Begin" on page 133. 2 Remove the hinge cover (see "Hinge Cover" on page 139). 3 Remove the screw securing the card. 4 Grasp the connector end of the card and slide it out from under the securing tabs. 5 Disconnect the cable from the card. Adding and Replacing Parts 151
-
 1
1 -
2
-
3
-
4
-
5
-
6
-
7
-
8
-
9
-
10
-
11
-
12
-
13
-
14
-
15
-
16
-
17
-
18
-
19
-
20
-
21
-
22
-
23
-
24
-
25
-
26
-
27
-
28
-
29
-
30
-
31
-
32
-
33
-
34
-
35
-
36
-
37
-
38
-
39
-
40
-
41
-
42
-
43
-
44
-
45
-
46
-
47
-
48
-
49
-
50
-
51
-
52
-
53
-
54
-
55
-
56
-
57
-
58
-
59
-
60
-
61
-
62
-
63
-
64
-
65
-
66
-
67
-
68
-
69
-
70
-
71
-
72
-
73
-
74
-
75
-
76
-
77
-
78
-
79
-
80
-
81
-
82
-
83
-
84
-
85
-
86
-
87
-
88
-
89
-
90
-
91
-
92
-
93
-
94
-
95
-
96
-
97
-
98
-
99
-
100
-
101
-
102
-
103
-
104
-
105
-
106
-
107
-
108
-
109
-
110
-
111
-
112
-
113
-
114
-
115
-
116
-
117
-
118
-
119
-
120
-
121
-
122
-
123
-
124
-
125
-
126
-
127
-
128
-
129
-
130
-
131
-
132
-
133
-
134
-
135
-
136
-
137
-
138
-
139
-
140
-
141
-
142
-
143
-
144
-
145
-
146
-
147
-
 148
148 -
 149
149 -
 150
150 -
 151
151 -
 152
152 -
 153
153 -
 154
154 -
 155
155 -
 156
156 -
 157
157 -
 158
158 -
159
-
160
-
161
-
162
-
163
-
164
-
165
-
166
-
167
-
168
-
169
-
170
-
171
-
172
-
173
-
174
-
175
-
176
-
177
-
178
-
179
-
180
-
181
-
182
-
183
-
184
-
185
-
186
-
187
-
188
-
189
-
190
-
191
-
192
-
193
-
194
-
195
-
196
-
197
-
198
-
199
-
200
-
201
-
202
-
203
-
204
-
205
-
206
 |
 |
