Dell Inspiron X200 Service Manual - Page 27
Reserve Battery
 |
View all Dell Inspiron X200 manuals
Add to My Manuals
Save this manual to your list of manuals |
Page 27 highlights
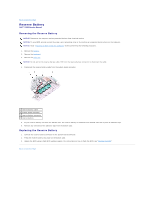
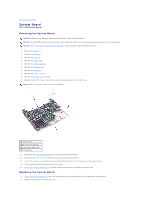
Back to Contents Page Reserve Battery Dell™ X200 Service Manual Removing the Reserve Battery NOTICE: Disconnect the computer and any attached devices from electrical outlets. NOTICE: To avoid ESD, ground yourself by using a wrist grounding strap or by touching an unpainted metal surface on the computer. NOTICE: Read "Preparing to Work Inside the Computer" before performing the following procedure. 1. Remove the battery. 2. Remove the keyboard. 3. Remove the palm rest. NOTICE: Do not pull on the reserve battery cable. Pull from the reserve battery connector to disconnect the cable. 4. Disconnect the reserve battery cable from the system board connector. 1 reserve battery cable 2 system board connector 3 reserve battery connector 4 reserve battery 5. Pry the reserve battery free from the bottom case. The reserve battery is attached to the bottom case with a piece of adhesive tape. 6. Remove any remnants of the adhesive tape from the bottom case. Replacing the Reserve Battery 1. Connect the reserve battery connector to the system board connector. 2. Press the reserve battery into place on the bottom case. 3. Update the BIOS using a flash BIOS update program. For instructions on how to flash the BIOS, see "Flashing the BIOS." Back to Contents Page
-
 1
1 -
2
-
3
-
4
-
5
-
6
-
7
-
8
-
9
-
10
-
11
-
12
-
13
-
14
-
15
-
16
-
17
-
18
-
19
-
20
-
21
-
 22
22 -
 23
23 -
 24
24 -
 25
25 -
 26
26 -
 27
27 -
 28
28 -
 29
29 -
 30
30 -
 31
31 -
 32
32 -
33
-
34
 |
 |
