Dell OptiPlex 3010 User Manual - Page 26
Removing the Power Supply
 |
View all Dell OptiPlex 3010 manuals
Add to My Manuals
Save this manual to your list of manuals |
Page 26 highlights
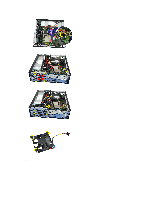
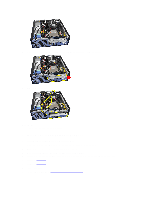
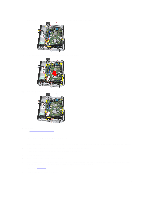
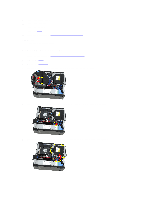
Related Links Removing The Input/Output (I/O) Panel Removing the Power Supply 1. Follow the procedures in Before Working Inside Your Computer. 2. Remove the cover. 3. Remove the front bezel. 4. Remove the drive cage. 5. Remove the fan shelter. 6. Disconnect the 4-pin power cable from the system board. 7. Unthread the 4-pin power cable from the chassis clips. 8. Disconnect the 24-pin power cable from the system board. 9. Remove the screws that secure the power supply, from the back of the computer. 26
-
 1
1 -
2
-
3
-
4
-
5
-
6
-
7
-
8
-
9
-
10
-
11
-
12
-
13
-
14
-
15
-
16
-
17
-
18
-
19
-
20
-
 21
21 -
 22
22 -
 23
23 -
 24
24 -
 25
25 -
 26
26 -
 27
27 -
 28
28 -
 29
29 -
 30
30 -
 31
31 -
32
-
33
-
34
-
35
-
36
-
37
-
38
-
39
-
40
-
41
-
42
-
43
-
44
-
45
-
46
-
47
-
48
-
49
-
50
-
51
-
52
-
53
-
54
-
55
-
56
-
57
-
58
-
59
-
60
-
61
-
62
-
63
 |
 |

Related Links
Removing The Input/Output (I/O) Panel
Removing the Power Supply
1.
Follow the procedures in
Before Working Inside Your Computer
.
2.
Remove the
cover
.
3.
Remove the
front bezel
.
4.
Remove the
drive cage
.
5.
Remove the
fan shelter
.
6.
Disconnect the 4-pin power cable from the system board.
7.
Unthread the 4–pin power cable from the chassis clips.
8.
Disconnect the 24-pin power cable from the system board.
9.
Remove the screws that secure the power supply, from the back of the computer.
26