Dell PowerEdge M610 Web Tools Administrator’s Guide - Page 192
Creating port groups, Editing or viewing port groups, Con WWN-N_Port mappings
 |
View all Dell PowerEdge M610 manuals
Add to My Manuals
Save this manual to your list of manuals |
Page 192 highlights
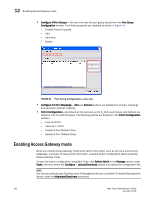
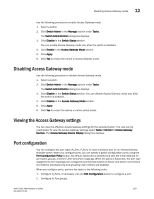
12 Port configuration DRAFT: BROCADE CONFIDENTIAL 3. Configure F_Port-to-N_Port mappings. You can set up primary and secondary mappings. The secondary mapping is the N_Port to which an F_Port is mapped when the primary N_Port mapping goes offline. 4. Configure WWN-N_Port mappings Creating port groups You can group a number of N_Ports (and its mapped F_Ports) together to connect to multiple independent fabrics or to create performance optimized ports. To group a number of ports, you must create a new port group and assign desired N_Ports to it. The N_Port grouping option is enabled by default, and all N_Ports are members of a default port group 0 (pg0). Access Gateway prevents failover of F_Ports across N_Port groups. NOTE If you want to distribute F_Ports among groups, you can leave all ports in the default port group 0, or you can disable N_Port grouping. Use the following procedure to create port groups. 1. Click a port in the Switch View to open the Port Administration window. 2. Make sure that you have selected Advanced from the Port Configuration Policy drop-down list. 3. Click Configure N_Port Groups. NOTE Configure N_Port Groups is disabled if you select Automatic from the Port Configuration Policy drop-down list. 4. In the Port Group Configuration dialog box, click Add. The Add Port Group window displays. 5. Enter the ID for the new port group in the Port Group ID* field. 6. Enter the name for the new port group in the Port Group Name field. 7. Select the Login Balancing check box to enable login balance for the port group. 8. Select the Fabric Name Monitoring check box to manually configure the managed fabric name monitoring. 9. Under the Select Members(N-Port)* section, select the required ports you want to group. 10. Click Save. 11. Click Close on the Port Group Configuration dialog box. Editing or viewing port groups Use the following procedure to edit port groups. 1. Click a port in the Switch View to open the Port Administration window. 2. Click Configure N_Port Groups. 3. On Port Group Configuration dialog box, select the group that you want to edit and then click Edit/View. 164 Web Tools Administrator's Guide 53-1001772-01
-
 1
1 -
2
-
3
-
4
-
5
-
6
-
7
-
8
-
9
-
10
-
11
-
12
-
13
-
14
-
15
-
16
-
17
-
18
-
19
-
20
-
21
-
22
-
23
-
24
-
25
-
26
-
27
-
28
-
29
-
30
-
31
-
32
-
33
-
34
-
35
-
36
-
37
-
38
-
39
-
40
-
41
-
42
-
43
-
44
-
45
-
46
-
47
-
48
-
49
-
50
-
51
-
52
-
53
-
54
-
55
-
56
-
57
-
58
-
59
-
60
-
61
-
62
-
63
-
64
-
65
-
66
-
67
-
68
-
69
-
70
-
71
-
72
-
73
-
74
-
75
-
76
-
77
-
78
-
79
-
80
-
81
-
82
-
83
-
84
-
85
-
86
-
87
-
88
-
89
-
90
-
91
-
92
-
93
-
94
-
95
-
96
-
97
-
98
-
99
-
100
-
101
-
102
-
103
-
104
-
105
-
106
-
107
-
108
-
109
-
110
-
111
-
112
-
113
-
114
-
115
-
116
-
117
-
118
-
119
-
120
-
121
-
122
-
123
-
124
-
125
-
126
-
127
-
128
-
129
-
130
-
131
-
132
-
133
-
134
-
135
-
136
-
137
-
138
-
139
-
140
-
141
-
142
-
143
-
144
-
145
-
146
-
147
-
148
-
149
-
150
-
151
-
152
-
153
-
154
-
155
-
156
-
157
-
158
-
159
-
160
-
161
-
162
-
163
-
164
-
165
-
166
-
167
-
168
-
169
-
170
-
171
-
172
-
173
-
174
-
175
-
176
-
177
-
178
-
179
-
180
-
181
-
182
-
183
-
184
-
185
-
186
-
 187
187 -
 188
188 -
 189
189 -
 190
190 -
 191
191 -
 192
192 -
 193
193 -
 194
194 -
 195
195 -
 196
196 -
 197
197 -
198
-
199
-
200
-
201
-
202
-
203
-
204
-
205
-
206
-
207
-
208
-
209
-
210
-
211
-
212
-
213
-
214
-
215
-
216
-
217
-
218
-
219
-
220
-
221
-
222
-
223
-
224
-
225
-
226
-
227
-
228
-
229
-
230
-
231
-
232
-
233
-
234
-
235
-
236
-
237
-
238
-
239
-
240
-
241
-
242
-
243
-
244
-
245
-
246
-
247
-
248
-
249
-
250
-
251
-
252
-
253
-
254
-
255
-
256
-
257
-
258
-
259
-
260
-
261
-
262
-
263
-
264
-
265
-
266
-
267
-
268
-
269
-
270
-
271
-
272
-
273
-
274
-
275
-
276
-
277
-
278
-
279
-
280
-
281
-
282
-
283
-
284
-
285
-
286
-
287
-
288
-
289
-
290
-
291
-
292
-
293
-
294
-
295
-
296
-
297
-
298
-
299
-
300
-
301
-
302
-
303
-
304
-
305
-
306
-
307
-
308
-
309
-
310
 |
 |
