Dell PowerVault NX300 User Manual - Page 29
Option 2: Windows 2008 Domain Controller as Identity Mapping Source
 |
View all Dell PowerVault NX300 manuals
Add to My Manuals
Save this manual to your list of manuals |
Page 29 highlights
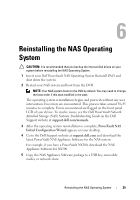
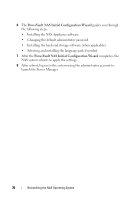
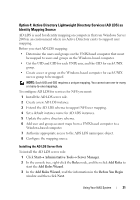
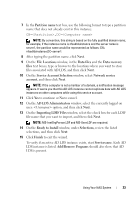
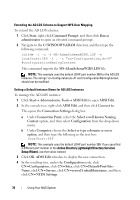
Option 2: Windows 2008 Domain Controller as Identity Mapping Source Go to the Windows 2008 Domain Controller and install Identity Management for Unix using Server Manager Roles Add Role Services. NOTE: Windows 2008 Domain Controller needs to be rebooted to activate this service. Configuration Steps 1 Go to NFS client, note down the user name, group name, UID and GID details. 2 Go to the Domain Controller. 3 Open Active Directory Users and Computers, and create the UNIX user name and group. 4 Add the user to the group created in the previous step. 5 Select the newly-created user, go to Properties Unix Attributes. Modify the UID, GID, shell, home directory, and domain details (captured earlier from the NFS client). 6 Select the newly-created group, check the GID (ensure it matches the UNIX GID), modify the UNIX properties, add the members (users that you added in the previous step) and click Apply. 7 Go to PowerVault NAS Windows Storage Server 2008 (NFS) Server. 8 Click StartPrograms Administrative Tools Services for Network File System (NFS). 9 Select Services for NFS, right-click Properties Active Directory domain name as your Identity mapping source, type the Windows 2008 domain name and click Apply. Option 3: User Name Mapping (UNM) Server as Identity Mapping Source 1 On the NAS system, click Start Administrative Tools Services for Network File System (NFS). 2 In the window that appears, right-click Services for NFS and select Properties. 3 Select User Name Mapping as the Identity mapping source and type the Hostname of your User Name Mapping server in the space provided. Using Your NAS System 29
-
 1
1 -
2
-
3
-
4
-
5
-
6
-
7
-
8
-
9
-
10
-
11
-
12
-
13
-
14
-
15
-
16
-
17
-
18
-
19
-
20
-
21
-
22
-
23
-
 24
24 -
 25
25 -
 26
26 -
 27
27 -
 28
28 -
 29
29 -
 30
30 -
 31
31 -
 32
32 -
 33
33 -
 34
34 -
35
-
36
-
37
-
38
-
39
-
40
-
41
-
42
-
43
-
44
-
45
-
46
-
47
-
48
-
49
-
50
 |
 |