Dell Precision 330 Service Manual - Page 67
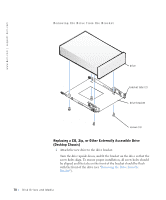
Removing the Diskette Drive from the Bracket (Desktop Chassis)
 |
View all Dell Precision 330 manuals
Add to My Manuals
Save this manual to your list of manuals |
Page 67 highlights
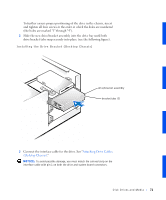
Removing the Diskette Drive from the Bracket (Desktop Chassis) screw drive drive retention pins (2) drive bracket Replacing the Diskette Drive (Desktop Chassis) 1 Mount the diskette drive on the bracket: a Lower the right side of the diskette drive onto the bracket, inserting the drive retention pins into the screw holes on the drive. See "Removing the Diskette Drive from the Bracket (Desktop Chassis)." b Lower the left side of the diskette drive downward and secure it to the bracket with the screw you removed in step 5 of "Removing the Diskette Drive (Desktop Chassis)." 2 Slide the drive assembly into the chassis until the green diskette-drive bracket release button snaps securely into place. See "Removing the Diskette-Drive Bracket (Desktop Chassis)." 3 Connect the interface cable for the drive. To locate this connector, see "System Board Components" or "Interior Service Label." Disk Dri ves and Media 67
-
 1
1 -
2
-
3
-
4
-
5
-
6
-
7
-
8
-
9
-
10
-
11
-
12
-
13
-
14
-
15
-
16
-
17
-
18
-
19
-
20
-
21
-
22
-
23
-
24
-
25
-
26
-
27
-
28
-
29
-
30
-
31
-
32
-
33
-
34
-
35
-
36
-
37
-
38
-
39
-
40
-
41
-
42
-
43
-
44
-
45
-
46
-
47
-
48
-
49
-
50
-
51
-
52
-
53
-
54
-
55
-
56
-
57
-
58
-
59
-
60
-
61
-
 62
62 -
 63
63 -
 64
64 -
 65
65 -
 66
66 -
 67
67 -
 68
68 -
 69
69 -
 70
70 -
 71
71 -
 72
72 -
73
-
74
-
75
-
76
-
77
-
78
-
79
-
80
-
81
-
82
-
83
-
84
-
85
-
86
-
87
-
88
-
89
-
90
-
91
-
92
-
93
-
94
-
95
-
96
-
97
-
98
-
99
-
100
-
101
-
102
-
103
-
104
-
105
-
106
-
107
-
108
-
109
-
110
-
111
-
112
-
113
-
114
-
115
-
116
-
117
-
118
-
119
-
120
-
121
-
122
-
123
-
124
-
125
-
126
-
127
-
128
-
129
-
130
-
131
-
132
-
133
-
134
-
135
-
136
-
137
-
138
-
139
-
140
-
141
-
142
-
143
-
144
-
145
-
146
-
147
-
148
-
149
-
150
-
151
-
152
-
153
-
154
-
155
-
156
-
157
-
158
-
159
-
160
-
161
-
162
-
163
-
164
-
165
-
166
-
167
-
168
-
169
-
170
 |
 |
