Dell Precision 330 Service Manual - Page 74
Removing the Hard-Drive Bracket (Desktop Chassis)
 |
View all Dell Precision 330 manuals
Add to My Manuals
Save this manual to your list of manuals |
Page 74 highlights
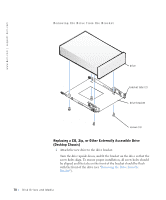
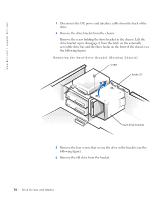
www.dell.com | support.dell.com 3 Disconnect the DC power and interface cables from the back of the drive. 4 Remove the drive bracket from the chassis. Remove the screw holding the drive bracket in the chassis. Lift the drive bracket up to disengage it from the latch on the externally accessible drive bay and the three hooks on the front of the chassis (see the following figure). Removing the Hard-Drive Bracket (Desktop Chassis) screw hooks (3) hard-drive bracket 5 Remove the four screws that secure the drive in the bracket (see the following figure). 6 Remove the old drive from the bracket 74 Disk Dri ves and Media
-
 1
1 -
2
-
3
-
4
-
5
-
6
-
7
-
8
-
9
-
10
-
11
-
12
-
13
-
14
-
15
-
16
-
17
-
18
-
19
-
20
-
21
-
22
-
23
-
24
-
25
-
26
-
27
-
28
-
29
-
30
-
31
-
32
-
33
-
34
-
35
-
36
-
37
-
38
-
39
-
40
-
41
-
42
-
43
-
44
-
45
-
46
-
47
-
48
-
49
-
50
-
51
-
52
-
53
-
54
-
55
-
56
-
57
-
58
-
59
-
60
-
61
-
62
-
63
-
64
-
65
-
66
-
67
-
68
-
 69
69 -
 70
70 -
 71
71 -
 72
72 -
 73
73 -
 74
74 -
 75
75 -
 76
76 -
 77
77 -
 78
78 -
 79
79 -
80
-
81
-
82
-
83
-
84
-
85
-
86
-
87
-
88
-
89
-
90
-
91
-
92
-
93
-
94
-
95
-
96
-
97
-
98
-
99
-
100
-
101
-
102
-
103
-
104
-
105
-
106
-
107
-
108
-
109
-
110
-
111
-
112
-
113
-
114
-
115
-
116
-
117
-
118
-
119
-
120
-
121
-
122
-
123
-
124
-
125
-
126
-
127
-
128
-
129
-
130
-
131
-
132
-
133
-
134
-
135
-
136
-
137
-
138
-
139
-
140
-
141
-
142
-
143
-
144
-
145
-
146
-
147
-
148
-
149
-
150
-
151
-
152
-
153
-
154
-
155
-
156
-
157
-
158
-
159
-
160
-
161
-
162
-
163
-
164
-
165
-
166
-
167
-
168
-
169
-
170
 |
 |

74
Disk Drives and Media
www.dell.com | support.dell.com
3
Disconnect the DC power and interface cables from the back of the
drive.
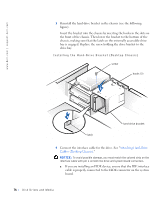
4
Remove the drive bracket from the chassis.
Remove the screw holding the drive bracket in the chassis. Lift the
drive bracket up to disengage it from the latch on the externally
accessible drive bay and the three hooks on the front of the chassis (see
the following figure).
Removing the Hard-Drive Bracket (Desktop Chassis)
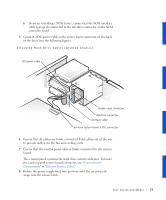
5
Remove the four screws that secure the drive in the bracket (see the
following figure).
6
Remove the old drive from the bracket
screw
hooks (3)
hard-drive bracket