Dell Precision 330 Service Manual - Page 75
Removing a Hard Drive from the Bracket (Desktop Chassis), Replacing a Hard Drive (Desktop Chassis)
 |
View all Dell Precision 330 manuals
Add to My Manuals
Save this manual to your list of manuals |
Page 75 highlights
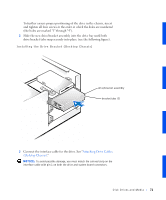
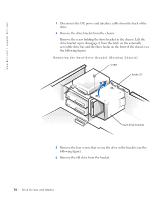
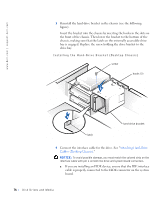
Removing a Hard Drive from the Bracket (Desktop Chassis) drive bracket drive screws (4) Replacing a Hard Drive (Desktop Chassis) 1 Slide the drive into one of bracket bays, oriented so that the connectors on the back of the drive will face the interior of the chassis when the bracket is reinstalled. NOTE: Orient the drive in the bracket so that its bottom will face the left side of the chassis when the bracket is installed in the chassis. 2 Align the screw holes of the drive and bracket, and secure the drive in the bracket using the screws that came with the upgrade kit. See "Removing a Hard Drive from the Bracket (Desktop Chassis)." Disk Dri ves and Media 75
-
 1
1 -
2
-
3
-
4
-
5
-
6
-
7
-
8
-
9
-
10
-
11
-
12
-
13
-
14
-
15
-
16
-
17
-
18
-
19
-
20
-
21
-
22
-
23
-
24
-
25
-
26
-
27
-
28
-
29
-
30
-
31
-
32
-
33
-
34
-
35
-
36
-
37
-
38
-
39
-
40
-
41
-
42
-
43
-
44
-
45
-
46
-
47
-
48
-
49
-
50
-
51
-
52
-
53
-
54
-
55
-
56
-
57
-
58
-
59
-
60
-
61
-
62
-
63
-
64
-
65
-
66
-
67
-
68
-
69
-
 70
70 -
 71
71 -
 72
72 -
 73
73 -
 74
74 -
 75
75 -
 76
76 -
 77
77 -
 78
78 -
 79
79 -
 80
80 -
81
-
82
-
83
-
84
-
85
-
86
-
87
-
88
-
89
-
90
-
91
-
92
-
93
-
94
-
95
-
96
-
97
-
98
-
99
-
100
-
101
-
102
-
103
-
104
-
105
-
106
-
107
-
108
-
109
-
110
-
111
-
112
-
113
-
114
-
115
-
116
-
117
-
118
-
119
-
120
-
121
-
122
-
123
-
124
-
125
-
126
-
127
-
128
-
129
-
130
-
131
-
132
-
133
-
134
-
135
-
136
-
137
-
138
-
139
-
140
-
141
-
142
-
143
-
144
-
145
-
146
-
147
-
148
-
149
-
150
-
151
-
152
-
153
-
154
-
155
-
156
-
157
-
158
-
159
-
160
-
161
-
162
-
163
-
164
-
165
-
166
-
167
-
168
-
169
-
170
 |
 |

Disk Drives and Media
75
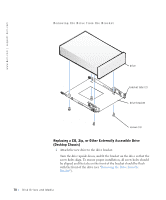
Removing a Hard Drive from the Bracket (Desktop Chassis)
Replacing a Hard Drive (Desktop Chassis)
1
Slide the drive into one of bracket bays, oriented so that the
connectors on the back of the drive will face the interior of the chassis
when the bracket is reinstalled.
NOTE:
Orient the drive in the bracket so that its bottom will face the left
side of the chassis when the bracket is installed in the chassis.
2
Align the screw holes of the drive and bracket, and secure the drive in
the bracket using the screws that came with the upgrade kit. See
"
Removing a Hard Drive from the Bracket (Desktop Chassis)
."
screws (4)
drive
drive bracket