Dell Precision M90 User Guide - Page 61
Returning a Hard Drive to Dell - hard drives
 |
View all Dell Precision M90 manuals
Add to My Manuals
Save this manual to your list of manuals |
Page 61 highlights
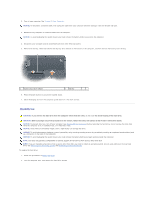
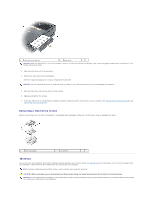
1 hard drive screws (2) 2 hard drive NOTICE: When the hard drive is not in the computer, store it in protective antistatic packaging. See "Protecting Against Electrostatic Discharge" in the Product Information Guide. 3. Slide the hard drive out of the computer. 4. Remove the new drive from its packaging. Save the original packaging for storing or shipping the hard drive. NOTICE: Use firm and even pressure to slide the drive into place. If you use excessive force, you may damage the connector. 5. Slide the hard drive into the bay until it is fully seated. 6. Replace and tighten the screws. 7. If the new hard drive is not already pre-imaged, install the operating system and drivers for your computer. See Restoring Your Operating System and Reinstalling Drivers and Utilities. Returning a Hard Drive to Dell Return your old hard drive to Dell in its original or comparable foam packaging. Otherwise, the hard drive may be damaged in transit. 1 foam packaging 2 hard drive Memory You can increase your computer memory by installing memory modules on the system board. See Specifications for information on the memory supported by your computer. Install only memory modules that are intended for your computer. NOTE: Memory modules purchased from Dell are covered under your computer warranty. CAUTION: Before you begin any of the procedures in this section, follow the safety instructions in the Product Information Guide. NOTICE: To avoid electrostatic discharge, ground yourself by using a wrist grounding strap or by periodically touching an unpainted metal surface (such as a connector on the back of the computer).
-
 1
1 -
2
-
3
-
4
-
5
-
6
-
7
-
8
-
9
-
10
-
11
-
12
-
13
-
14
-
15
-
16
-
17
-
18
-
19
-
20
-
21
-
22
-
23
-
24
-
25
-
26
-
27
-
28
-
29
-
30
-
31
-
32
-
33
-
34
-
35
-
36
-
37
-
38
-
39
-
40
-
41
-
42
-
43
-
44
-
45
-
46
-
47
-
48
-
49
-
50
-
51
-
52
-
53
-
54
-
55
-
 56
56 -
 57
57 -
 58
58 -
 59
59 -
 60
60 -
 61
61 -
 62
62 -
 63
63 -
 64
64 -
 65
65 -
 66
66 -
67
-
68
-
69
-
70
-
71
-
72
-
73
-
74
-
75
-
76
-
77
-
78
-
79
-
80
-
81
-
82
-
83
-
84
-
85
-
86
-
87
-
88
-
89
-
90
-
91
-
92
-
93
-
94
-
95
-
96
-
97
-
98
-
99
-
100
-
101
-
102
-
103
-
104
-
105
-
106
-
107
-
108
 |
 |
