Dell Precision M90 User Guide - Page 68
Optical Drive, Internal Card With Bluetooth, Wireless Technology
 |
View all Dell Precision M90 manuals
Add to My Manuals
Save this manual to your list of manuals |
Page 68 highlights
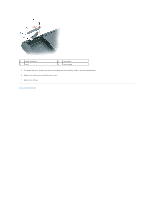
5. Install the replacement battery: a. Insert the battery at a 30-degree angle under the release latch with the positive side up, and then push the battery into place. b. Connect the battery cable to the connector on the system board. 6. Replace the keyboard (see Keyboard). 7. Replace the hinge cover (see Hinge Cover). Optical Drive CAUTION: Before you begin any of the procedures in this section, follow the safety instructions in the Product Information Guide. 1. Follow the procedures in Before You Begin. 2. Turn the computer over. 3. Remove the optical-drive security screw. 4. Insert a scribe into the notch and push it to the side to release the drive from the bay. 1 notch 2 optical-drive security screw 3 optical drive 5. Slide the drive out of the bay. To reinstall the optical drive, slide the drive into the drive bay and snap it into place. Then replace the optical-drive security screw. Internal Card With Bluetooth® Wireless Technology CAUTION: Before you begin any of the procedures in this section, follow the safety instructions in the Product Information Guide. NOTICE: To avoid electrostatic discharge, ground yourself by using a wrist grounding strap or by periodically touching an unpainted metal surface (such as a connector on the back of the computer). NOTICE: To avoid damaging the system board, you must remove the battery before you begin working inside the computer. If you ordered a card with Bluetooth wireless technology with your computer, it is already installed. 1. Follow the procedures in Before You Begin. 2. Remove the battery. See Replacing the Battery. 3. Remove the cover screw and remove the card cover from the computer. 4. Pull the card out of the compartment so that you can disconnect the card from its cable and remove it from the computer.
-
 1
1 -
2
-
3
-
4
-
5
-
6
-
7
-
8
-
9
-
10
-
11
-
12
-
13
-
14
-
15
-
16
-
17
-
18
-
19
-
20
-
21
-
22
-
23
-
24
-
25
-
26
-
27
-
28
-
29
-
30
-
31
-
32
-
33
-
34
-
35
-
36
-
37
-
38
-
39
-
40
-
41
-
42
-
43
-
44
-
45
-
46
-
47
-
48
-
49
-
50
-
51
-
52
-
53
-
54
-
55
-
56
-
57
-
58
-
59
-
60
-
61
-
62
-
 63
63 -
 64
64 -
 65
65 -
 66
66 -
 67
67 -
 68
68 -
 69
69 -
 70
70 -
 71
71 -
 72
72 -
 73
73 -
74
-
75
-
76
-
77
-
78
-
79
-
80
-
81
-
82
-
83
-
84
-
85
-
86
-
87
-
88
-
89
-
90
-
91
-
92
-
93
-
94
-
95
-
96
-
97
-
98
-
99
-
100
-
101
-
102
-
103
-
104
-
105
-
106
-
107
-
108
 |
 |
