Dell TL4000 User Guide - Page 158
Export media, Control, Move Cartridges, Magazine, Open I/O station
 |
View all Dell TL4000 manuals
Add to My Manuals
Save this manual to your list of manuals |
Page 158 highlights
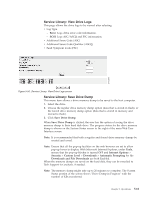
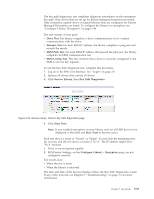
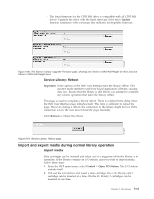
3. Close the I/O station. The library automatically starts an inventory. The cartridges in the I/O station are counted but unassigned until they are moved into storage slots. 4. From the OCP main menu, select Control > Move Cartridges and move the data cartridges into the wanted data slots. See "Control: Move Cartridges" on page 5-17 or "Manage Library: Move media" on page 5-41 for more information. If the library does not have an I/O station (all slots are assigned to storage), and you want to import media, you must release a magazine and insert the cartridges manually following these steps: 1. From the OCP main menu, select Control > Magazine. Choose the magazine to unlock and remove. 2. Pull out the magazine and insert data cartridges into the empty slots. 3. Push the magazine back into the library. The library automatically starts an inventory. 4. To move cartridges in the magazine once they are inserted, from the OCP main menu, select Control > Move Cartridges and move the data cartridges into the wanted slots. See "Control: Move Cartridges" on page 5-17 or "Manage Library: Move media" on page 5-41 for more information. Note: If you run a library configuration backup program on your host computer, use the program to run an audit of the library after new cartridges are added to update the backup program. Export media To remove cartridges from your library with your I/O station, follow these steps: 1. From the OCP main menu, select Control > Move Cartridges and move the data cartridges into the I/O station. See "Control: Move Cartridges" on page 5-17 or "Manage Library: Move media" on page 5-41 for more information. 2. From the OCP main menu, select Control > Open I/O station. The I/O station unlocks itself 3. Pull out the I/O station and take out the data cartridges. 4. Push the I/O station back into the library. The library automatically starts an inventory of the I/O station. If you do not have an I/O station (all slots are assigned to storage), and want to export media, you must release a magazine and take out the cartridges manually following these steps: 1. From the OCP main menu, select Control > Magazine. Choose the magazine that you want to unlock/remove. 2. Pull out the magazine and remove the wanted data cartridges. 3. Push the magazine back into the library. The library automatically starts an inventory. Note: If you run a library configuration backup program on your host computer, use the program to run an audit of the library after cartridges are removed to update the backup program. 5-66 Dell PowerVault TL2000 Tape Library and TL4000 Tape Library User's Guide
-
 1
1 -
2
-
3
-
4
-
5
-
6
-
7
-
8
-
9
-
10
-
11
-
12
-
13
-
14
-
15
-
16
-
17
-
18
-
19
-
20
-
21
-
22
-
23
-
24
-
25
-
26
-
27
-
28
-
29
-
30
-
31
-
32
-
33
-
34
-
35
-
36
-
37
-
38
-
39
-
40
-
41
-
42
-
43
-
44
-
45
-
46
-
47
-
48
-
49
-
50
-
51
-
52
-
53
-
54
-
55
-
56
-
57
-
58
-
59
-
60
-
61
-
62
-
63
-
64
-
65
-
66
-
67
-
68
-
69
-
70
-
71
-
72
-
73
-
74
-
75
-
76
-
77
-
78
-
79
-
80
-
81
-
82
-
83
-
84
-
85
-
86
-
87
-
88
-
89
-
90
-
91
-
92
-
93
-
94
-
95
-
96
-
97
-
98
-
99
-
100
-
101
-
102
-
103
-
104
-
105
-
106
-
107
-
108
-
109
-
110
-
111
-
112
-
113
-
114
-
115
-
116
-
117
-
118
-
119
-
120
-
121
-
122
-
123
-
124
-
125
-
126
-
127
-
128
-
129
-
130
-
131
-
132
-
133
-
134
-
135
-
136
-
137
-
138
-
139
-
140
-
141
-
142
-
143
-
144
-
145
-
146
-
147
-
148
-
149
-
150
-
151
-
152
-
 153
153 -
 154
154 -
 155
155 -
 156
156 -
 157
157 -
 158
158 -
 159
159 -
 160
160 -
 161
161 -
 162
162 -
 163
163 -
164
-
165
-
166
-
167
-
168
-
169
-
170
-
171
-
172
-
173
-
174
-
175
-
176
-
177
-
178
-
179
-
180
-
181
-
182
-
183
-
184
-
185
-
186
-
187
-
188
-
189
-
190
-
191
-
192
-
193
-
194
-
195
-
196
-
197
-
198
-
199
-
200
-
201
-
202
-
203
-
204
-
205
-
206
-
207
-
208
-
209
-
210
-
211
-
212
-
213
-
214
-
215
-
216
-
217
-
218
-
219
-
220
-
221
-
222
-
223
-
224
-
225
-
226
-
227
-
228
-
229
-
230
-
231
-
232
-
233
-
234
-
235
-
236
-
237
-
238
-
239
-
240
-
241
-
242
-
243
-
244
-
245
-
246
-
247
-
248
-
249
-
250
-
251
-
252
-
253
-
254
-
255
-
256
-
257
-
258
-
259
-
260
-
261
-
262
-
263
-
264
-
265
-
266
-
267
-
268
-
269
-
270
-
271
-
272
-
273
-
274
-
275
-
276
-
277
-
278
-
279
-
280
-
281
-
282
-
283
-
284
-
285
-
286
-
287
-
288
-
289
-
290
-
291
-
292
-
293
-
294
-
295
-
296
 |
 |