Dell UP2414Q Dell UltraSharp 24 User's Guide
Dell UP2414Q Manual
 |
View all Dell UP2414Q manuals
Add to My Manuals
Save this manual to your list of manuals |
Dell UP2414Q manual content summary:
- Dell UP2414Q | Dell UltraSharp 24 User's Guide - Page 1
Dell UltraSharp 24 Monitor User's Guide Model No. : UP2414Q Regulatory model: UP2414Qt Regulatory type: UP2414Q001 - Dell UP2414Q | Dell UltraSharp 24 User's Guide - Page 2
damage to hardware or loss of data if instructions are not followed. WARNING: A WARNING indicates a potential for property damage, personal injury, or death. Information in this document is subject to change without notice. © 2013 Dell Inc. All rights reserved. Reproduction of these materials - Dell UP2414Q | Dell UltraSharp 24 User's Guide - Page 3
23 Wall Mounting (Optional 24 3 Operating the Monitor 25 Using the Front Panel Controls 25 Using the On-Screen Display (OSD) Menu 28 Setting the Maximum Resolution 44 Setting the DP1.2 Display 45 Using the Tilt, Swivel and Vertical Extension 47 Rotating the Monitor 48 4 Troubleshooting - Dell UP2414Q | Dell UltraSharp 24 User's Guide - Page 4
Product Specific Problems 55 Troubleshooting the Card Reader 56 5 Appendix 58 WARNING: Safety Instructions 58 FCC Notices (U.S. Only) and Other Regulatory Information 58 Contact Dell 58 6 Setting Up Your Monitor 59 Setting the display resolution to 3840 x 2160 (maximum 59 If you have a - Dell UP2414Q | Dell UltraSharp 24 User's Guide - Page 5
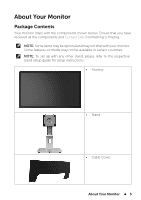
and Contact Dell if something is missing. NOTE: Some items may be optional and may not ship with your monitor. Some features or media may not be available in certain countries. NOTE: To set up with any other stand, please refer to the respective stand setup guide for setup instructions. • Monitor - Dell UP2414Q | Dell UltraSharp 24 User's Guide - Page 6
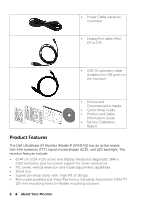
• Drivers and Documentation media • Quick Setup Guide • Product and Safety Information Guide • Factory Calibration Report Product Features The Dell UltraSharp 24 Monitor (Model # UP2414Q) has an active matrix, thin-film transistor (TFT), liquid crystal display (LCD), and LED backlight. The monitor - Dell UP2414Q | Dell UltraSharp 24 User's Guide - Page 7
supported by your system. • On-Screen Display (OSD) adjustments for ease of set-up and screen optimization. • Software and documentation media includes an information file (INF), Image color Matching File (ICM), Dell Display by the monitor in real time. • TCO Certified Displays. Identifying Parts - Dell UP2414Q | Dell UltraSharp 24 User's Guide - Page 8
6 USB downstream port with battery charging 7 Cable management slot Back view with monitor stand Use Wall mount monitor using VESAcompatible wall . Secures monitor with security cable lock. Refer to this label if you need to contact Dell for technical support. Release stand from monitor. Connect - Dell UP2414Q | Dell UltraSharp 24 User's Guide - Page 9
Connect your computer with DP cable. 3 Mini DisplayPort in connector Connect your computer with Mini DP to DP cable. 4 HDMI connector Connect your computer with HDMI cable. 5 USB upstream port Connect the USB cable that comes with your monitor to the computer. Once this cable is connected - Dell UP2414Q | Dell UltraSharp 24 User's Guide - Page 10
and the DP source's graphics card must be DP1.2 certified with MST feature, capable of supporting resolution up to 3840 x 2160 at 60Hz and its driver supports DisplayID v1.3. Video Supported Modes Video display capabilities (HDMI playback) 480p, 576p, 720p and 1080p 10 About Your Monitor - Dell UP2414Q | Dell UltraSharp 24 User's Guide - Page 11
Display Modes Display Mode 54.0 24.0 MST feature, capable of supporting resolution up to 3840 x 2160 at 60Hz and its driver supports support AC input voltage/ frequency/current Inrush current 100 to 240 VAC/50 or 60 Hz ± 3 Hz/2.1 A (Max.) 120 V:30 A (Max.) 240 V:60 A (Max.) About Your Monitor - Dell UP2414Q | Dell UltraSharp 24 User's Guide - Page 12
DisplayPort connector. Mini DisplayPort connector. HDMI connector. USB 3.0 update stream port connector. USB 3.0 down stream port connector x 4. (Port with lightning icon is for BC 1.2) DisplayPort to Mini DisplayPort inches) 10.0 kg (22.05 lb) 7.1 kg (15.65 lb) 4.8 kg (10.58 lb) 2.0 kg (4. - Dell UP2414Q | Dell UltraSharp 24 User's Guide - Page 13
: -20 °C to 60 °C (-4 °F to 140 °F) 10% to 80% (non-condensing) Storage: 5% to 90% mode, the following message will be displayed: Dell UP2414Q There is no signal coming from your computer. Press any key on the keyboard or move the mouse to wake it up. If there is no display, press the monitor - Dell UP2414Q | Dell UltraSharp 24 User's Guide - Page 14
access to the OSD. NOTE: This monitor is ENERGY STAR®-compliant. Pin Assignments DisplayPort Connector (DP in and DP out) Pin Number 20-pin Side of the monitor connector 1 ML0(p) 2 GND 3 ML0(n) 4 ML1(p) 5 GND 6 ML1(n) 7 ML2(p) 8 GND 9 ML2(n) 10 ML3(p) Pin Number 20-pin Side - Dell UP2414Q | Dell UltraSharp 24 User's Guide - Page 15
Mini DisplayPort Connector Pin Number 20-pin Side of the monitor connector 1 GND 2 Hot Plug Detect 3 ML3(n) 4 GND 5 ML3(n) 6 GND 7 GND 8 GND 9 ML2(n) 10 ML0(p) Pin Number 20-pin Side of the monitor connector 11 ML2(p) 12 ML0(p) 13 GND 14 GND 15 ML1(n) 16 AUX(p) - Dell UP2414Q | Dell UltraSharp 24 User's Guide - Page 16
your monitor. NOTE: The USB ports on this monitor are USB 3.0 compliant. Transfer speed SuperSpeed Hi-Speed Full speed Data Rate 5 Gbps 480 Mbps 12 Mbps Power Consumption 4.5 W (Max., each port) 2.5 W (Max., each port) 2.5 W (Max., each port) NOTE: Up to 1.5 A on USB downstream port (port with - Dell UP2414Q | Dell UltraSharp 24 User's Guide - Page 17
Windows® Vista, Windows® 7 Service Pack 1 (SP1) and Windows® 8/Windows® 8.1 operating systems. • Mass Storage Class device (No drivers are required under Microsoft® Windows® Vista, Windows® 7 Service Pack 1 (SP1) and Windows® 8/Windows® 8.1). • Supports various memory card media. About Your Monitor - Dell UP2414Q | Dell UltraSharp 24 User's Guide - Page 18
Capacity by Spec. 32 GB UP2414Q Supported 32 GB Supported 1 TB Supported 32 GB Supported Connection type Supported OS USB 2.0/3.0 High and Super Speed Device (USB High Speed Device compatible) Microsoft® Windows® Vista, Windows® 7 Service Pack 1 (SP1) and Windows® 8/Windows® 8.1. Plug and - Dell UP2414Q | Dell UltraSharp 24 User's Guide - Page 19
affect the display quality or usability. For more information on Dell Monitor Quality and Pixel Policy, see Dell Support site at: http://www.dell. com/support/monitors. Maintenance Guidelines Cleaning Your Monitor WARNING: Read and follow the Safety Instructions before cleaning the monitor. WARNING - Dell UP2414Q | Dell UltraSharp 24 User's Guide - Page 20
shipped from the factory. NOTE: This is applicable for a monitor with a stand. When any other stand is bought, please refer to the respective stand setup guide for set up instructions. To attach the monitor stand: 1. Remove the cover and place the monitor on it. 2. Fit the two tabs on the upper part - Dell UP2414Q | Dell UltraSharp 24 User's Guide - Page 21
your computer and monitor into a nearby outlet. 4. Turn On the monitor and the computer. If your monitor displays an image, installation is complete. If it does not display an image, see Troubleshooting. 5. Use the cable slot on the monitor stand to organize the cables. Setting Up the Monitor 21 - Dell UP2414Q | Dell UltraSharp 24 User's Guide - Page 22
of illustration only. Appearance of the computer may vary. Organizing the Cables After attaching all necessary cables to your monitor and computer, (See Connecting Your Monitor for cable attachment,) use the cable management slot to organize all cables as shown above. Attaching the Cable Cover - Dell UP2414Q | Dell UltraSharp 24 User's Guide - Page 23
stand, ensure that the monitor is placed on a clean surface. NOTE: This is applicable for a monitor with a stand. When any other stand is bought, please refer to the respective stand setup guide for set up instructions. To remove the stand: 1. Place the monitor on a flat surface. 2. Press and hold - Dell UP2414Q | Dell UltraSharp 24 User's Guide - Page 24
(Screw dimension: M4 x 10 mm). Refer to the instructions that come with the VESA-compatible wall mounting kit. 1. Place the monitor panel on a soft cloth from the wall mounting kit to the monitor. 5. Mount the monitor on the wall by following the instructions that came with the wall mounting kit. - Dell UP2414Q | Dell UltraSharp 24 User's Guide - Page 25
the control buttons on the front of the monitor to adjust the characteristics of the image being displayed. As you use these buttons to adjust the controls, an OSD shows the numeric values of the characteristics as they change. Preset Modes 1 Brightness/Contrast 2 Input Source 3 Menu 4 Exit - Dell UP2414Q | Dell UltraSharp 24 User's Guide - Page 26
monitor. • DisplayPort input • Mini DisplayPort input 3 • HDMI input Input Source Displays the source selection bar. Press and buttons to move between the setting Use the Power button to turn the monitor On and Off. 6 Power The white LED indicates the monitor is On and fully functional. ( - Dell UP2414Q | Dell UltraSharp 24 User's Guide - Page 27
Front Panel Button Use the buttons on the front of the monitor to adjust the image settings. Front panel Button 1 Description 1 Use the Up button to adjust (increase ranges) items in the OSD . OK 4 4 Use the Back button to go back to the previous menu. Back Operating the Monitor 27 - Dell UP2414Q | Dell UltraSharp 24 User's Guide - Page 28
the monitor automatically saves those changes. The changes are also saved if you change the settings and then wait for the OSD menu to disappear. 1. Press the Menu button to launch the OSD menu and display the main menu. Dell UP2414Q Brightness/Contrast Input Source Color Settings Display Settings - Dell UP2414Q | Dell UltraSharp 24 User's Guide - Page 29
being consumed by the monitor in real time. Use this menu to activate Brightness/Contrast adjustment. Dell UP2414Q Brightness/Contrast Input Source Energy Use Color Settings Display Settings PBP Settings 50 50 Energy Settings Menu Settings Other Settings Personalize Brightness Contrast - Dell UP2414Q | Dell UltraSharp 24 User's Guide - Page 30
to your monitor. Dell UP2414Q Energy Use Brightness/Contrast Input Source Color Settings Display Settings Scan Sources DisplayPort Mini DisplayPort HDMI PBP Settings Energy Settings Menu Settings Other Settings Personalize Scan Sources DisplayPort Mini DisplayPort HDMI Resolution - Dell UP2414Q | Dell UltraSharp 24 User's Guide - Page 31
menu to adjust the monitor's color settings . Dell UP2414Q Brightness/Contrast Input Source Color Settings Display Settings PBP Settings Energy Settings Menu Settings Other Settings Personalize Input Color Format Gamma Preset Modes Zonal Color Space Contrast(2) Reset Color Settings Energy Use RGB - Dell UP2414Q | Dell UltraSharp 24 User's Guide - Page 32
color modes. Dell UP2414Q Brightness/Contrast Input Source Color Settings Display Settings PBP Settings Energy Settings Menu Settings Other Settings Personalize Input Color Format Gamma Preset Modes Zonal Color Space Contrast(2) Reset Color Settings Energy Use Standard Multimedia Movie Game Paper - Dell UP2414Q | Dell UltraSharp 24 User's Guide - Page 33
color. • CAL1/CAL2: User calibrated preset mode using Dell Ultrasharp Color Calibration Software or other Dell approved software. Dell Ultrasharp Color Calibration Software works with the X-rite colorimeter i1Display Pro. The i1Display Pro can be purchased from the Dell Electronics, Software and - Dell UP2414Q | Dell UltraSharp 24 User's Guide - Page 34
increase the purple shade of the video NOTE: Hue adjustment is available only for Movie and Game mode. This feature can adjust the color saturation of the video image. Use or to adjust the only for video input. Resets your monitor's color settings to the factory defaults. 34 Operating the - Dell UP2414Q | Dell UltraSharp 24 User's Guide - Page 35
image. Dell UP2414Q Brightness/Contrast Input Source Color Settings Display Settings PBP Settings Energy Settings Menu Settings Other Settings Personalize Energy Use Aspect Ratio 16:9 Sharpness 50 Noise Reduction Dynamic Contrast Uniformity Compensation O DisplayPort 1.2 Display Info - Dell UP2414Q | Dell UltraSharp 24 User's Guide - Page 36
DDM (Dell Display Manager) may not run. NOTE: Ensure that your graphics card driver can support DP1.2 with MST feature, capable of displaying 3840 x 2160 at 60Hz and its driver supports DisplayID v1.3, or the display may not show correctly. Display Info Displays the monitor's current settings. Reset - Dell UP2414Q | Dell UltraSharp 24 User's Guide - Page 37
√ DP x x √ HDMI √ √ x PBP submenu when PBP On Dell UP2414Q Brightness/Contrast Input Source Color Settings Display Settings PBP Settings Energy Settings Menu Settings Other Settings Personalize PBP Mode Size Energy Use DisplayPort Fill PBP Resolution: - Resolution: 3840x2160, 30Hz PBP - Dell UP2414Q | Dell UltraSharp 24 User's Guide - Page 38
screen of PBP mode. Energy Settings Dell UP2414Q Energy Use Brightness/Contrast Input Source Color Settings Power Button LED USB Reset Energy Settings On During Active O During Standby Display Settings PBP Settings Energy Settings Menu Settings Other Settings Personalize Power Button - Dell UP2414Q | Dell UltraSharp 24 User's Guide - Page 39
Settings Dell UP2414Q Brightness/Contrast Input Source Color Settings Display Settings PBP Settings Energy Settings Menu Settings Other Settings Personalize Language Transparency Timer Lock Reset Menu Settings Energy Use English 20 20 s Unlock Language Transparency Timer Lock Reset Menu Settings - Dell UP2414Q | Dell UltraSharp 24 User's Guide - Page 40
. Dell UP2414Q Energy Use Brightness/Contrast Button Sound O Input Source Auto Rotate On Color Settings DDC/CI Enable Display Settings PBP Settings Energy Settings LCD Conditioning Reset Other Settings Factory Reset Disable Reset All Settings Menu Settings Other Settings Personalize - Dell UP2414Q | Dell UltraSharp 24 User's Guide - Page 41
disable this feature by selecting Disable. Enable this feature for best user experience and optimum performance of your monitor. Dell UP2414Q Brightness/Contrast Input Source Color Settings Display Settings PBP Settings Energy Settings Button Sound Auto Rotate DDC/CI LCD Conditioning Reset Other - Dell UP2414Q | Dell UltraSharp 24 User's Guide - Page 42
to continue? No Yes When the monitor does not support a particular resolution mode you will see the following message: Dell UP2414Q The current input timing is not supported by the monitor display. Please change your input timing to 3840x2160 @ 30/60Hz or any other monitor listed timing as per the - Dell UP2414Q | Dell UltraSharp 24 User's Guide - Page 43
on the On-Screen-Display menu. If either HDMI, DP or m-DP input is selected and the corresponding cable is not connected, a floating dialog box as shown below appears. Dell UP2414Q No DisplayPort Cable The display will go into Power Save Mode in 5 minutes. www.dell.com/support/monitors Operating the - Dell UP2414Q | Dell UltraSharp 24 User's Guide - Page 44
.dell.com/support/monitors or Dell UP2414Q No HDMI Cable The display will go into Power Save Mode in 5 minutes. www.dell.com/support/monitors See Troubleshooting for more information. Setting the Maximum Resolution In Windows Vista®, Windows® 7 or Windows® 8/Windows® 8.1: 1. For Windows® 8/Windows - Dell UP2414Q | Dell UltraSharp 24 User's Guide - Page 45
Go to DisplayPort 1.2 selection. 3. Select Enable or Disable accordingly. 4. Follow the screen message to confirm selection of DP1.2 or DP1.1a. Dell UP2414Q Please ensure your Graphics Card can support DP MST (Daisy chain)/HBR2 (High Bit Rate) before changing the monitor setting to DP1.2. Incorrect - Dell UP2414Q | Dell UltraSharp 24 User's Guide - Page 46
8 sec. 4. The DisplayPort configuration message will appear: Dell UP2414Q DisplayPort 1.2 ? Enable Disable 5. Use the button to enable DP1.2 or button to exit without making any changes. Repeat the above steps to change the setting back to DP1.1a if necessary. 46 Operating the Monitor - Dell UP2414Q | Dell UltraSharp 24 User's Guide - Page 47
Using the Tilt, Swivel and Vertical Extension NOTE: This is applicable for a monitor with a stand. When any other stand is bought, please refer to the respective stand setup guide for set up instructions. 5° typical (maximum 6°) 45° 130 mm 45° 21° typical (maximum 22°) NOTE: The stand is detached - Dell UP2414Q | Dell UltraSharp 24 User's Guide - Page 48
Rotating the Monitor Before you rotate the monitor, your monitor should be fully vertically extended and fully tilted up to avoid hitting the bottom edge of the monitor. 48 Operating the Monitor - Dell UP2414Q | Dell UltraSharp 24 User's Guide - Page 49
, go to www. dell.com/support and see the Download section for Video Drivers for latest driver updates. When in the Portrait View Mode, you may experience performance degradation in graphic-intensive applications (3D Gaming and etc.). Adjusting the Rotation Display Settings of Your System After - Dell UP2414Q | Dell UltraSharp 24 User's Guide - Page 50
the screen. Dell UP2414Q Dell UP2414Q No DisplayPort Cable The display will go into Power Save Mode in 5 minutes. www.dell.com/support/monitors or No Mini DisplayPort Cable The display will go into Power Save Mode in 5 minutes. www.dell.com/support/monitors or Dell UP2414Q No HDMI Cable - Dell UP2414Q | Dell UltraSharp 24 User's Guide - Page 51
problem with your monitor, or with your computer and video card. NOTE: You can run the built-in diagnostics only when the video cable is unplugged and the monitor is in self-test mode changes to red. 6. Inspect the display for any abnormalities. 7. Repeat steps 5 and 6 to inspect the display in - Dell UP2414Q | Dell UltraSharp 24 User's Guide - Page 52
Source menu. No Video/Power LED On • Check the Power Button LED option under Energy Settings in OSD Menu. No picture or • Increase brightness & contrast no brightness controls via OSD. • Perform monitor self-test feature check. • Check for bent or broken pins in the video cable connector - Dell UP2414Q | Dell UltraSharp 24 User's Guide - Page 53
• Contact Dell immediately. • Ensure that the video cable connecting the monitor to the computer is connected properly and is secure. • Reset the monitor to Factory Settings. • Perform monitor self-test feature check to determine if the intermittent problem occurs in self-test mode. Troubleshooting - Dell UP2414Q | Dell UltraSharp 24 User's Guide - Page 54
Format to RGB or YPbPr in the Color Settings OSD. Run the built-in diagnostics. Use the Power Management feature to turn Off the monitor at all times when not in use (for more information, see Power Management Modes). Alternatively, use a dynamically changing screensaver. 54 Troubleshooting - Dell UP2414Q | Dell UltraSharp 24 User's Guide - Page 55
Product Specific Problems Specific What You Symptoms Experience Possible Solutions Screen image Image is • is too small centered on screen, but • does not fill entire viewing area Check the Aspect Ratio setting in Display Settings OSD. Reset the monitor to Factory Settings. Cannot OSD - Dell UP2414Q | Dell UltraSharp 24 User's Guide - Page 56
Troubleshooting the Card Reader CAUTION: Do not remove the device while reading or writing media. Doing so may cause loss of data or malfunction in the media. Problem Cause Drive letter is not Conflict with network • assigned. drive letter. (Windows® XP only) Solution - Right-click My - Dell UP2414Q | Dell UltraSharp 24 User's Guide - Page 57
erasing. folder." Displays the error window disappears of the pop-up during writing, if you window, monitor is powered On. Reconnect the upstream cable from your computer to the monitor. Reinsert the media. Switch Off and then turn On the monitor again. Reboot the computer. Troubleshooting - Dell UP2414Q | Dell UltraSharp 24 User's Guide - Page 58
or mechanical hazards. For information on safety instructions, see the Product Information Guide. FCC Notices (U.S. Only) and Other Regulatory services may not be available in your area. To contact Dell for sales, technical support, or customer service issues: 1. Visit http://www.dell.com/support/. - Dell UP2414Q | Dell UltraSharp 24 User's Guide - Page 59
Change Display Settings. 3. Move the slider-bar to the right by pressing and holding the left-mouse button and adjust the screen resolution to 3840 x 2160. 4. Click OK. If you do not see 3840 x 2160 as an option, you may need to update your graphics driver. Please choose the scenario below that best - Dell UP2414Q | Dell UltraSharp 24 User's Guide - Page 60
or a DellTM portable computer with internet access 1. Go to http://www.dell.com/support/, enter your service tag, and download the latest driver for your graphics card. 2. After installing the drivers for your Graphics Adapter, attempt to set the resolution to 3840 x 2160 again. NOTE: If you are - Dell UP2414Q | Dell UltraSharp 24 User's Guide - Page 61
click Personalization. 2. Click Change Display Settings. 3. Click Advanced Settings. 4. Identify your graphics controller supplier from the description at the top of the window (e.g. NVIDIA, ATI, Intel etc.). 5. Refer to the graphic card provider website for updated driver (for example, http://www - Dell UP2414Q | Dell UltraSharp 24 User's Guide - Page 62
Procedures for setting up dual monitors in Windows Vista®, Windows® 7 or Windows® 8/Windows® 8.1 Content (a) For Windows Vista® (b) For Windows® 7 (c) For Windows® 8/Windows® 8.1 (d) Setting Display Styles For Multiple Monitor (a) For Windows Vista® Connect the external monitor(s) to your laptop or - Dell UP2414Q | Dell UltraSharp 24 User's Guide - Page 63
2. Click Display Settings. 3. Click Identify Monitors. You may need to restart your system and repeat steps 1 to 3 if the system does not detect the added monitor. Setting Up Your Monitor 63 - Dell UP2414Q | Dell UltraSharp 24 User's Guide - Page 64
on the desktop and click Screen resolution. 2. Click Multiple displays to choose a display selection. If you do not see the additional monitor listed, click Detect. You may need to restart your system and repeat steps 1 to 2 if the system does not detect the added monitor. 64 Setting Up Your - Dell UP2414Q | Dell UltraSharp 24 User's Guide - Page 65
using a video cable (DP, HDMI etc.) and follow any of the below setup method. Method 1: Using keyboard shortcut "Win+P" 1. Press the Windows logo key + P on your keyboard. 2. While holding down the Windows logo key, press P to toggle be- tween the display selections. Setting Up Your Monitor 65 - Dell UP2414Q | Dell UltraSharp 24 User's Guide - Page 66
Method 2: Using the "Screen Resolution" menu 1. From the Start screen, select Desktop tile to switch to the Classic Windows desktop. 2. Right-click on the desktop and click Screen resolution. 66 Setting Up Your Monitor - Dell UP2414Q | Dell UltraSharp 24 User's Guide - Page 67
3. Click Multiple displays to choose a display selection. If you do not see the additional monitor listed, click Detect. You may need to restart your system and repeat steps 1 to 3 if the system does not detect the added monitor. Setting Up Your Monitor 67 - Dell UP2414Q | Dell UltraSharp 24 User's Guide - Page 68
fonts on multiple monitors that suits the user preference. Duplicate these displays: Duplicate the same screen on two monitors with the same resolution, chosen based on the monitor with a lower resolution. (i) For Windows Vista® [DUPLICATE NOT AVAILABLE] (ii) For Windows® 7 68 Setting Up Your - Dell UP2414Q | Dell UltraSharp 24 User's Guide - Page 69
8/Windows® 8.1 Extend these displays: This option is recommended when an external monitor is connected to a laptop, and each monitor can display different screen independently to improve user convenience. The relative position of the screens can be set up here, for example monitor 1 may be set up - Dell UP2414Q | Dell UltraSharp 24 User's Guide - Page 70
(i) For Windows Vista® (ii) For Windows® 7 70 Setting Up Your Monitor - Dell UP2414Q | Dell UltraSharp 24 User's Guide - Page 71
(iii) For Windows® 8/Windows® 8.1 Show desktop only on...: Display the status of a particular monitor. This option is typically chosen when the laptop is used as a PC so the user can enjoy a large external monitor. Most current laptops support mainstream resolutions. As shown in the figure above, - Dell UP2414Q | Dell UltraSharp 24 User's Guide - Page 72
(i) For Windows Vista® 72 Setting Up Your Monitor - Dell UP2414Q | Dell UltraSharp 24 User's Guide - Page 73
(ii) For Windows® 7 Setting Up Your Monitor 73 - Dell UP2414Q | Dell UltraSharp 24 User's Guide - Page 74
(iii) For Windows® 8/Windows® 8.1 74 Setting Up Your Monitor
-
 1
1 -
 2
2 -
 3
3 -
 4
4 -
 5
5 -
 6
6 -
 7
7 -
8
-
9
-
10
-
11
-
12
-
13
-
14
-
15
-
16
-
17
-
18
-
19
-
20
-
21
-
22
-
23
-
24
-
25
-
26
-
27
-
28
-
29
-
30
-
31
-
32
-
33
-
34
-
35
-
36
-
37
-
38
-
39
-
40
-
41
-
42
-
43
-
44
-
45
-
46
-
47
-
48
-
49
-
50
-
51
-
52
-
53
-
54
-
55
-
56
-
57
-
58
-
59
-
60
-
61
-
62
-
63
-
64
-
65
-
66
-
67
-
68
-
69
-
70
-
71
-
72
-
73
-
74
 |
 |

Model No. : UP2414Q
Regulatory model: UP2414Qt
Regulatory type: UP2414Q001
Dell UltraSharp 24 Monitor
User’s Guide