Dell W-7205 Controller Installation Guide - Page 26
Required Tools and Equipment, Installation Steps, Attaching the Wall-Mount Brackets
 |
View all Dell W-7205 manuals
Add to My Manuals
Save this manual to your list of manuals |
Page 26 highlights
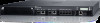
Required Tools and Equipment The following tools and equipment are required for installing the W-7205 controller on a wall: l Wall-mount brackets (x2) (included in the mounting accessory kit) l Screws for the mounting bracket (x8): M4 x 8 mm Phillips Flat Head Screws l Wall anchors: Optional (not included in the package) l Wall-mount screws (not included in this package, the type of screw depends on the installation surface) l Suitable screwdrivers (not included in the package) Installation Steps To install a W-7205 controller on a wall: NOTE: Ensure that the Ethernet ports are facing down when installing the W-7205 controller on a wall. 1. Fasten the wall-mount brackets over the mounting holes on the sides of the controller using the eight screws for the mounting brackets (four per bracket) and a suitable screwdriver (see Figure 12). Figure 12 Attaching the Wall-Mount Brackets 2. After choosing a mounting location, mark the points on the wall for the mounting holes. 3. Drill the holes and insert wall anchors if the installation requires them. 4. Align the holes of the mounting bracket with the holes drilled in the wall (see Figure 13). 5. Use appropriate screws to secure the controller. 26 | Installation Dell Networking W-7205 Controller | Installation Guide
-
 1
1 -
2
-
3
-
4
-
5
-
6
-
7
-
8
-
9
-
10
-
11
-
12
-
13
-
14
-
15
-
16
-
17
-
18
-
19
-
20
-
 21
21 -
 22
22 -
 23
23 -
 24
24 -
 25
25 -
 26
26 -
 27
27 -
 28
28 -
 29
29 -
 30
30 -
 31
31 -
32
-
33
-
34
-
35
-
36
 |
 |
