Dynex DX-26LD150A11 User Manual (English) - Page 21
Adjusting the picture - remote control
 |
UPC - 600603127205
View all Dynex DX-26LD150A11 manuals
Add to My Manuals
Save this manual to your list of manuals |
Page 21 highlights
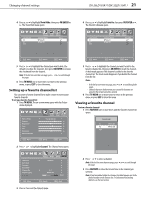
Adjusting the picture DX-26LD150A11/DX-32LD150A11 17 Navigating the menus TV MENU Press to display the main menu. OK ENTER Press to select menus, to adjust selected items, or move on-screen cursor left or right. OK ENTER Press to select the menu items. OK ENTER Press to confirm your selection or enter a sub-menu. TV MENU Press to return to the previous screen. EXIT Press to close the menu. Adjusting the picture Adjusting the picture To adjust the picture: 1 Press TV MENU. The on-screen menu opens with the Picture menu displayed. Picture Mode Contrast Brightness Color Tint Sharpness Advanced Video Picture Audio Setup Channel Energy Saving 70 50 60 0 55 Move Select MENU Exit 2 Press to access the Picture menu. 3 Press or to highlight an option, then press or to adjust the option. You can select: • Picture Mode-Selects the picture mode. You can select: • Energy Saving (the backlight brightness is decreased) • Custom (customized picture). • Vivid (a bright and vivid picture) • Standard (a standard picture) • Sports (a dynamic picture) • Theater (a finely detailed picture) Note: You can also press PICTURE on the remote control to select the picture mode. • Contrast-Adjusts the white levels of the TV picture. • Brightness-Adjusts the darkness of the black sections of the picture. • Color-Adjusts the color saturation. • Tint-Adjusts the image tint. • Sharpness-Adjust to enhance the object edges for picture detail. 4 Press or to highlight Advanced Video, then press OK/ENTER or to open the Advanced Video submenu. 5 Press or to highlight an option, then press or to adjust the option. You can select: • Color Temp.-Selects the color temperature. You can select Cool, Normal, or Warm. • Zoom Mode-Selects the aspect ratio of the picture. You can select Normal, Zoom, Wide, Cinema, Panorama, or Auto. Auto is only available under TV mode and when Auto Zoom is set to On. In VGA mode or HDMI mode when a computer is connect to the HDMI jack, only Wide and Normal are available. • Noise Reduction-Selects the noise reduction mode to reduce picture noise (snow). You can select Off, Weak, Middle, Strong, or Auto. Auto is only available in analog TV, AV, and S-Video mode. • Overscan-Select On or Off to choose your preferred picture size. When connected to a computer, to show full image on TV, overscan will be set to Off automatically. Note: Overscan only works when the input signal is 480i, 480p, 720p, 1080i, and 1080p in RGB color space by HDMI/DVI input. • Adaptive Contrast-You can select On or Off. Turn this On to optimize the picture display for a more vivid image. • DBC-Automatically adjusts the backlight to match the picture. The backlight brightens for bright scenes and darkens for dark scenes. You can select On or Off. • Auto Zoom-You can select On or Off. In TV mode, setting Auto Zoom to On lets you set the Zoom Mode to Auto. 6 Press TV MENU one or more times to return to the previous menu, or press EXIT to close the menu. Adjusting the computer image To adjust the computer image: 1 Make sure that your TV/DVD combo is in VGA mode. For more information, see "Selecting the video input source" on page 15. 2 Press TV MENU. The on-screen menu opens with the Picture menu displayed. Picture Mode Contrast Brightness Color Tint Sharpness Advanced Video Move Picture Audio Setup Channel Energy Saving 70 50 60 0 55 Select MENU Exit
-
 1
1 -
2
-
3
-
4
-
5
-
6
-
7
-
8
-
9
-
10
-
11
-
12
-
13
-
14
-
15
-
 16
16 -
 17
17 -
 18
18 -
 19
19 -
 20
20 -
 21
21 -
 22
22 -
 23
23 -
 24
24 -
 25
25 -
 26
26 -
27
-
28
-
29
-
30
-
31
-
32
-
33
-
34
-
35
-
36
-
37
-
38
-
39
-
40
-
41
-
42
-
43
-
44
-
45
-
46
-
47
-
48
-
49
-
50
-
51
-
52
 |
 |
