Dynex DX-26LD150A11 User Manual (English) - Page 37
Using USB
 |
UPC - 600603127205
View all Dynex DX-26LD150A11 manuals
Add to My Manuals
Save this manual to your list of manuals |
Page 37 highlights
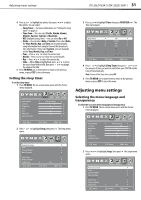
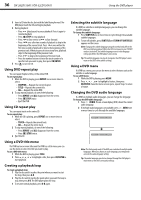
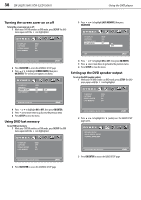
Using USB DX-26LD150A11/DX-32LD150A11 33 3 Press or to highlight Restore Default, then press OK/ENTER or . A confirmation box opens. 4 Press or to select Yes, then press OK/ENTER. 5 Press TV MENU one or more times to return to the previous menu, or press EXIT to close the menu. Using USB You can connect a USB device to your TV to view compatible JPEG pictures. Notes: • Never remove the USB device or turn off your TV while viewing JPEG pictures. • We recommend that you back up the data on your USB device. • The JPEG picture viewer only supports JPEG format images (with ".jpg" file extensions) and not all JPEG files are compatible with the TV. • Unless otherwise noted, all tasks in this section are based on using the remote control. Switching to USB mode To switch to USB mode: 1 Make sure that you have connected the USB device to the USB port on the side of your TV/DVD combo. 2 Press INPUT. The INPUT SOURCE menu opens. INPUT SOURCE TV AV S-Video Component1 Component2 DVD HDMI1 HDMI2 HDMI3 VGA USB 3 Press INPUT repeatedly or press or to select USB, then press OK/ENTER. Viewing photos To view photos: 1 Connect a USB storage device to the USB port on the side of your TV/DVD combo. 2 Press INPUT to select USB, then press OK/ENTER. The JPEG menu opens showing the folders and JPEG files on the device. USB JPEG Playlist Spring Summer Autumn Winter S7304460.JPG S7304461.JPG Picture Setup JPEG Directory 2009/02/10 Move MENU Exit ENTER Enter Return 3 Press or to select the folder you want, then press OK/ENTER. The folder opens. USB JPEG Playlist .. S7304448.JPG S7304449.JPG S7304450.JPG S7304451.JPG S7304452.JPG Picture Setup JPEG Move MENU Exit ENTER Enter Return 4 Press or to select the JPEG file you want. A preview of the file will display in the right window and information about the file will be shown under the picture. USB JPEG Playlist .. S7304448.JPG S7304449.JPG S7304450.JPG S7304451.JPG S7304452.JPG Picture Setup JPEG 4500×3000 4.2 MB 2009/08/10 10:16:00 Slide show Thumbnail Move MENU Exit ENTER Enter Return Thumbnail 5 If the picture in the window is the one you want, press OK/ENTER. The selected JPEG picture is shown on the screen. 6 When a photo is displayed in full screen, you can: • Press or to go to the previous or next photo. • Press ZOOM to zoom in on the picture, then press , , or to pan around the zoomed picture. • Press or to rotate the picture. • Press TV MENU to open the USB menu, then adjust the picture settings. For more information, see steps 4~5 of "Adjusting the photo settings" on page 34. Press TV MENU to return. • Press EXIT to exit. 7 When a JPEG file was highlighted in a folder, press to return to the previous menu, or press or to select the folder icon, then press OK/ENTER to return to the previous menu. 8 Press TV MENU to exit.
-
 1
1 -
2
-
3
-
4
-
5
-
6
-
7
-
8
-
9
-
10
-
11
-
12
-
13
-
14
-
15
-
16
-
17
-
18
-
19
-
20
-
21
-
22
-
23
-
24
-
25
-
26
-
27
-
28
-
29
-
30
-
31
-
 32
32 -
 33
33 -
 34
34 -
 35
35 -
 36
36 -
 37
37 -
 38
38 -
 39
39 -
 40
40 -
 41
41 -
 42
42 -
43
-
44
-
45
-
46
-
47
-
48
-
49
-
50
-
51
-
52
 |
 |
