Dynex DX-LDVD19-10A User Manual (English) - Page 17
Adjusting the picture - resolution
 |
UPC - 600603125263
View all Dynex DX-LDVD19-10A manuals
Add to My Manuals
Save this manual to your list of manuals |
Page 17 highlights
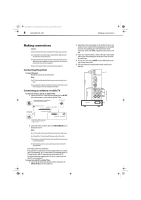
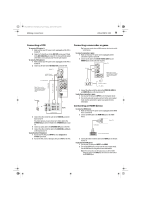
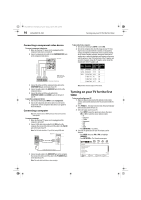
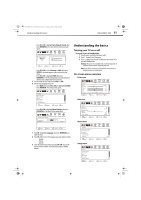
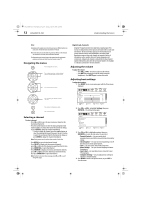
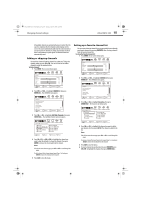
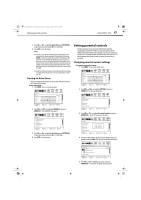
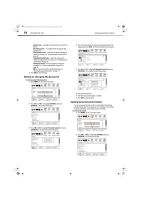
DX-LDVD19-10A_09-0340.book Page 13 Tuesday, April 28, 2009 4:43 PM Adjusting the picture DX-LDVD19-10A 13 Displaying additional information To display additional information: • Press INFO to show an information banner. The information banner shows current program information such as channel number, video input source, and resolution. • Digital mode information-Displays channel number, station name, channel label (if preset), broadcast program name, TV rating, signal type, audio information, resolution, current time, and current program start and end times. • Analog mode information-Displays channel number, channel label (if preset), signal type, and audio information. • Press GUIDE to display EPG OSD of the channel, including program name. channel number, program description, channel label, TV rating, digital closed caption, and program show time. Channel Number Channel label Program name 2.1 WGBH-SD TV-Rating TV-14 CS No Program Info Program Name Prev. 3-9 2010 11:00AM-12:00PM Next Digital closed caption Program description TV rating Program date Program show time Adjusting the picture Adjusting the TV picture To adjust the picture: 1 Press MENU. The on-screen menu opens with the Picture menu displayed, then press ENTER/CH- . The Picture menu opens. • Color Temperature-Select Warm (increased red), Normal, or Cool (increased blue). • Backlight-Adjusts the overall brilliance of the screen. • Noise Reduction-Selects the noise reduction mode to reduce picture noise (snow). Choose High, Middle, Low, or Off. • Advanced Contrast-Turn this On to optimize the picture display for a more vivid image. • Reset Picture Settings-Resets all picture settings to factory default. Note: You can only adjust Brightness, Contrast, Color Temperature, Tint, and Sharpness if you set the Mode to Custom. 3 Press MENU to return to the previous menu, or press EXIT to close the menu. Adjusting the computer image To adjust the computer image: 1 Make sure that your TV is in VGA mode. For more information, see "On-screen menu overview" on page 11. 2 Press MENU. The on-screen menu opens. Picture Mode Brightness Contrast Color Tint Sharpness CH+ VOL VOL - + CH- MOVE PICTURE AUDIO CHANNELS SETTINGS ENTER SELECT Custom 40 60 45 R5 +5 MENU PREVIOUS EXIT EXIT 3 Press VOL+ or VOL- to highlight Settings, then press ENTER/CH-. The Settings menu opens. Picture Mode Brightness Contrast Color Tint Sharpness CH+ VOL VOL - + CH- MOVE PICTURE AUDIO CHANNELS SETTINGS ENTER SELECT Custom 40 60 45 R5 +5 MENU PREVIOUS EXIT EXIT 2 Press CH+ or CH- to highlight an option, then press ENTER/VOL+ to enter the sub-menu. You can select: • Mode-Selects the picture mode - Vivid, Standard, Energy Savings, Theater, Sports, or Custom. You can also press PICTURE on the remote control to select the picture mode. • Brightness-Adjusts the brightness. • Contrast-Adjusts the contrast. • Color-Adjusts the color saturation. • Tint-Adjusts the image tint. • Sharpness-Adjusts the sharpness. • Advanced Video-Lets you set the following: • Aspect Ratio-Select Normal, Zoom, Wide, Cinema, or Auto Zoom. • Overscan-Turn this On to adjust the picture's reproduction rate when receiving DVI signals in VIDEO format. Available when the signal uses EIA timing (480i/480p/720p/1080i/1080p). PICTURE Settings Computer Settings Parental Controls Closed Caption Time Menu Settings Input Labels Computer Settings AUDIO CHANNELS SETTINGS CH+ VOL VOL - + CH- MOVE ENTER SELECT MENU PREVIOUS EXIT EXIT 4 Press CH+ or CH- to highlight Computer Settings, then press ENTER/VOL+. The Computer Settings menu opens. PICTURE Settings Computer Settings Auto Adjust H. Position V. Position Clock Phase Reset Computer settings AUDIO CHANNELS SETTINGS 50 50 50 29 CH+ VOL VOL - + CH- MOVE ENTER SELECT MENU PREVIOUS EXIT EXIT 5 Press CH+ or CH- to highlight an option, press ENTER/VOL+ to open the sub-menu, then press V0L+/- to adjust. You can select: • Auto Adjust-Automatically adjusts the image settings, such as position and phase • H-Position-Moves the image right or left
-
 1
1 -
2
-
3
-
4
-
5
-
6
-
7
-
8
-
9
-
10
-
11
-
 12
12 -
 13
13 -
 14
14 -
 15
15 -
 16
16 -
 17
17 -
 18
18 -
 19
19 -
 20
20 -
 21
21 -
 22
22 -
23
-
24
-
25
-
26
-
27
-
28
-
29
-
30
-
31
-
32
-
33
-
34
-
35
-
36
 |
 |