Dynex DX-LDVD19-10A User Manual (English) - Page 18
Adjusting the sound, Changing channel settings
 |
UPC - 600603125263
View all Dynex DX-LDVD19-10A manuals
Add to My Manuals
Save this manual to your list of manuals |
Page 18 highlights
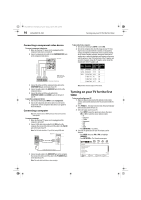
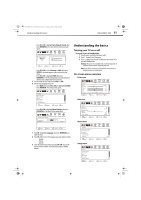
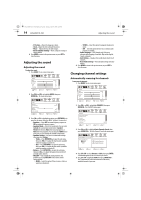
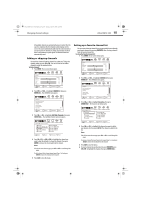
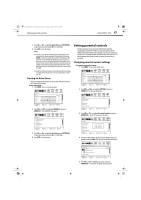
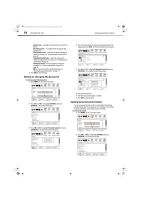
DX-LDVD19-10A_09-0340.book Page 14 Tuesday, April 28, 2009 4:43 PM 14 DX-LDVD19-10A Adjusting the sound • V-Position-Moves the image up or down • Clock-Adjust the clock setting of the picture • Phase-Adjusts the focus of stable images • Reset Computer Settings-Resets computer settings to factory default 6 Press MENU to return to the previous menu, or press EXIT to close the menu. Adjusting the sound Adjusting the sound To adjust the sound: 1 Press MENU. The on-screen menu opens. Picture Mode Brightness Contrast Color Tint Sharpness CH+ VOL VOL - + CH- MOVE PICTURE AUDIO CHANNELS SETTINGS ENTER SELECT Custom 40 60 45 R5 +5 MENU PREVIOUS EXIT EXIT 2 Press VOL+ or VOL- to highlight AUDIO, then press ENTER/CH-. The Audio menu opens. Audio Equalizer Equalizer Mode Equalizer Setting Balance MTS/SAP Audio Language PICTURE AUDIO CHANNELS SETTINGS On Custom L5 Mono English CH+ VOL VOL - + CH- MOVE ENTER SELECT MENU PREVIOUS EXIT EXIT 3 Press CH+ or CH- to highlight an option, press ENTER/VOL+ to open the sub-menu, then press CH+/- to adjust. You can select: • Equalizer-Select OFF for normal frequency response or ON for optimized frequency response. • Equalizer Mode-Selects the sound mode. You can select Custom (for a customized sound mode), Standard, Theater (for movies), Music (for musical programs), or News (for news programs). You can also press AUDIO one or more times to cycle through the available sound modes. • Equalizer Setting-Lets you set custom audio settings when you select Custom. • Treble-Press ENTER/VOL+ to open the sub-menu, then press V0L+/- to adjust the high sounds. (available when the equalizer is turned off ). • Bass-Press ENTER/VOL+ to open the sub-menu, then press V0L+/- to adjust the low sounds. (available when the equalizer is turned off ). • Balance-Press ENTER/VOL+ to open the sub-menu, then press V0L+/- to adjust the balance between the left and right audio channels. • MTS/SAP-Only available for analog channels. Also available by pressing MTS/SAP on the remote control. Options include: • MONO-Select this option if there is noise or static on weak stereo broadcasts. • STEREO-Select this option for programs broadcast in stereo. • SAP-Select this option to listen to a secondary audio program, if available. • Audio Language-(DTV channels only) Selects an alternate audio language, if available. May include English, French, or Spanish. • Auto Volume- Equalizes the overall volume levels for all channels. • Reset Audio Settings-Resets all audio settings to factory default. 4 Press MENU to return to the previous menu, or press EXIT to close the menu. Changing channel settings Automatically scanning for channels To auto scan for channels: 1 Press MENU. The on-screen menu opens. Picture Mode Brightness Contrast Color Tint Sharpness CH+ VOL VOL - + CH- MOVE PICTURE AUDIO CHANNELS SETTINGS Custom 40 60 45 R5 +5 ENTER SELECT MENU PREVIOUS EXIT EXIT 2 Press VOL+ or VOL- to highlight CHANNELS, then press ENTER/CH-. The CHANNELS menu opens. Channels Auto Channels Search Add/Skip Channels Favorites Channel Labels Channel Strength Audio Only PICTURE AUDIO CHANNELS SETTINGS Off CH+ VOL VOL - + CH- MOVE ENTER SELECT MENU PREVIOUS EXIT EXIT 3 Press CH+ or CH- to highlight Auto Channels Search, then press ENTER/VOL+. The Auto Channels Search sub-menu opens. PICTURE Channels Auto Channels Search AUDIO CHANNELS SETTINGS Choose your TV source Antenna Cable Start 0 Analog Channels 0 Digital Channels CH+ VOL VOL - + CH- MOVE ENTER SELECT MENU PREVIOUS EXIT EXIT 4 Press CH+/CH- to select Antenna or Cable, then press ENTER. A checkmark appears in the circle next to your choice. 5 Press CH+/CH- to highlight START, then press ENTER/VOL+. The TV automatically scans and memorizes all the active, available channels in your area.
-
 1
1 -
2
-
3
-
4
-
5
-
6
-
7
-
8
-
9
-
10
-
11
-
12
-
 13
13 -
 14
14 -
 15
15 -
 16
16 -
 17
17 -
 18
18 -
 19
19 -
 20
20 -
 21
21 -
 22
22 -
 23
23 -
24
-
25
-
26
-
27
-
28
-
29
-
30
-
31
-
32
-
33
-
34
-
35
-
36
 |
 |