Dynex DX-LDVD19-10A User Manual (English) - Page 8
TV components - stand
 |
UPC - 600603125263
View all Dynex DX-LDVD19-10A manuals
Add to My Manuals
Save this manual to your list of manuals |
Page 8 highlights
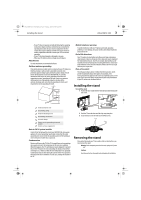
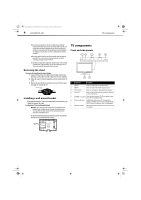
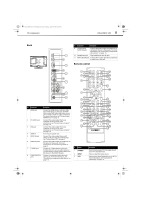
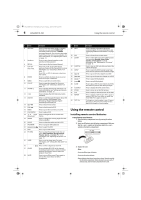
DX-LDVD19-10A_09-0340.book Page 4 Tuesday, April 28, 2009 4:43 PM 4 DX-LDVD19-10A TV components Make sure that you handle your TV very carefully when attempting removal of the stand. If you are not sure of your ability to do this, or to use the tools necessary to complete this job, refer to a professional installer or service personnel. The manufacturer is not responsible for any damages or injuries that occur due to mishandling or improper assembly. When using a table or bench as an aid to assembly, make sure that you place the TV on a soft cushion or covering to prevent accidental scratching or damage to your TV's finish. The speaker is not intended to support the weight of your TV. Do not move or handle your TV by the speaker. This can cause damage to your TV that is not covered by the manufacturer's warranty. Removing the stand To remove the stand from the stand column: 1 Lay your TV face down on a table or bench. Make sure that you put down a soft cushion or cloth so that your TV is not scratched. 2 Adjust the stand so that the angle between the stand and the TV is 90°. 3 Remove the two (2) M4 screws that secure your TV to the stand, then pull the stand off the TV. Remove screws Installing a wall-mount bracket If you want to attach the TV to a wall-mount bracket (not provided), you should first remove the stand. To attach your TV to a wall-mount bracket: Warning: These servicing instructions are for use by qualified service personnel only. To reduce the risk of hazards, do not perform any servicing other than that contained in the operating instructions unless you are qualified to do so. • Secure the wall-mount bracket to the back of your TV using the four M4 screws provided with the bracket. TV components Front and side panels MENU INPUT VOL+ VOL- CH+ CH- POWER # Component Description 1 MENU 2 INPUT 3 VOL+/VOL- Press to open the on-screen menu. Press to select the video input source. Press to increase or decrease the volume. 4 CH+/CH- Press to go to the next or previous channel in the channel list. 5 POWER button Press to turn on your TV. Press again to put your TV in standby mode. 6 Power indicator Lights blue when your TV is turned on. Lights red when your TV is in standby mode. Not lit when the power cord is unplugged. 7 Remote sensor Receives signals from the remote control. Do not block.
-
 1
1 -
2
-
 3
3 -
 4
4 -
 5
5 -
 6
6 -
 7
7 -
 8
8 -
 9
9 -
 10
10 -
 11
11 -
 12
12 -
 13
13 -
14
-
15
-
16
-
17
-
18
-
19
-
20
-
21
-
22
-
23
-
24
-
25
-
26
-
27
-
28
-
29
-
30
-
31
-
32
-
33
-
34
-
35
-
36
 |
 |
