Dynex DX-LDVD19-10A User Manual (English) - Page 9
Remote control - no power
 |
UPC - 600603125263
View all Dynex DX-LDVD19-10A manuals
Add to My Manuals
Save this manual to your list of manuals |
Page 9 highlights
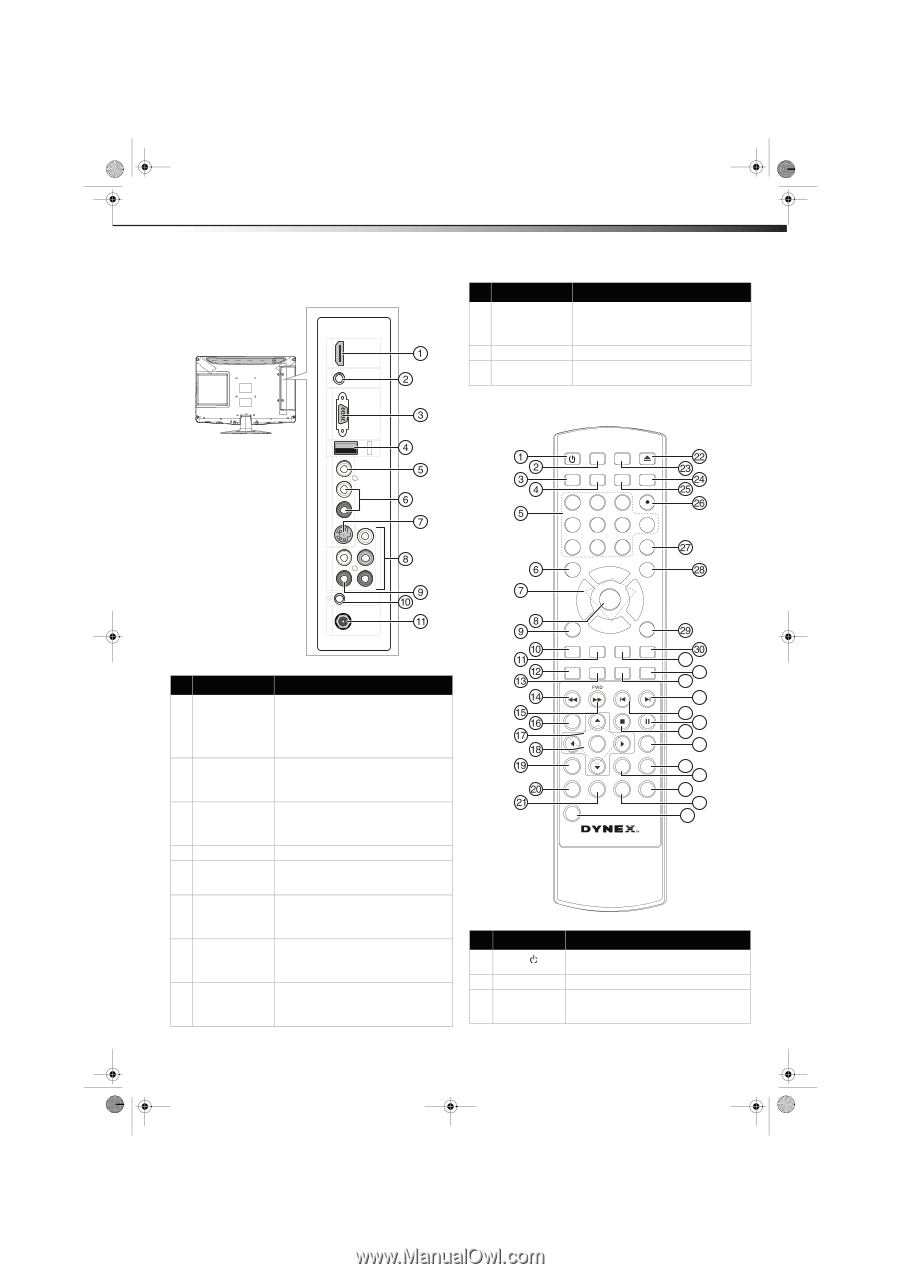
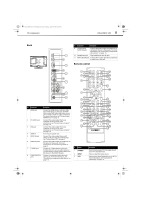
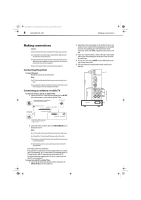
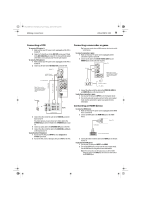
DX-LDVD19-10A_09-0340.book Page 5 Tuesday, April 28, 2009 4:43 PM TV components DX-LDVD19-10A 5 Back PC AUDIO IN HDMI ## Component Description 9 (Component) AUDIO IN jacks Connect the audio output (L and R) from a component device to these jacks. For more information, see "Connecting a component video device" on page 10. 10 Headphone jack Plug headphones into this jack. 11 ANT/CABLE IN jack Connect the 75 ohm cable from an antenna or cable box to this jack. Remote control VGA IN R AUDIO IN L S-VIDEO IN R AUDIO IN L VIDEO IN SERVICE ANT/CABLE IN ## Component 1 HDMI jack 2 PC AUDIO jack 3 VGA jack 4 SERVICE 5 VIDEO IN jack 6 AUDIO IN jacks 7 S-VIDEO jack 8 COMPONENT IN jacks Description Connect an HDMI device, such as a cable box or DVD player, to this jack. An HDMI cable carries both video and audio, so you do not need to make an audio connection. For more information, see "Connecting an HDMI device" on page 9. Connect the audio output from your computer to this jack. For more information, see "Connecting a computer" on page 10. Connect the video output from your computer to this jack. For more information, see "Connecting a computer" on page 10. For firmware update only. Connect the video output from an AV device to this jack. For more information, see "Connecting a VCR" on page 9. Connect the audio output (L and R) from an AV device to these jacks. For more information, see "Connecting a VCR" on page 9. Connect an S-Video device to this jack. S-Video does not carry an audio signal, so you will need to connect audio cables from the device to the AUDIO IN jacks. Connect a component video device to these jacks. For more information, see "Connecting a component video device" on page 10. # Button 1 POWER 2 INPUT 3 CCD Pr Pb Y COMPONENT IN POWER INPUT DVD OPEN/CLOSE CCD MTS/SAP SLEEP PICTURE 123 4 5 60 GUIDE 789 RECALL CH+ MUTE VOL - MENU ENTER CH- VOL + INFO CH.LIST FAVORITE ZOOM EXIT TITLE DISPLAY SETUP SUBTITLE REV PREV NEXT MENU STOP PAUSE PLAY/ENTER SLOW ANGLE ZOOM T.SEARCH AUDIO PROGRAM REPEAT A-B 10+ 31 32 33 34 35 36 37 38 39 40 41 42 43 Description Press to turn on your TV. Press again to put your TV in Standby mode. Press to select the input source. Press to turn closed captioning on or off. For more information, see "Using closed captioning" on page 20.
-
 1
1 -
2
-
3
-
 4
4 -
 5
5 -
 6
6 -
 7
7 -
 8
8 -
 9
9 -
 10
10 -
 11
11 -
 12
12 -
 13
13 -
 14
14 -
15
-
16
-
17
-
18
-
19
-
20
-
21
-
22
-
23
-
24
-
25
-
26
-
27
-
28
-
29
-
30
-
31
-
32
-
33
-
34
-
35
-
36
 |
 |