Epson B-510DN User's Guide - Page 138
Using the Printer on a Network, Setting Up Your Computers to Use the Printer - drive
 |
View all Epson B-510DN manuals
Add to My Manuals
Save this manual to your list of manuals |
Page 138 highlights
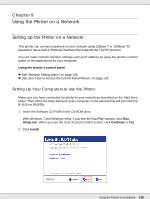
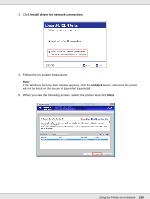
Chapter 9 Using the Printer on a Network Setting Up the Printer on a Network This printer can connect anywhere on your network using 10Base-T or 100Base-TX because it has a built-in Ethernet interface that supports the TCP/IP protocol. You can make network interface settings such as IP address by using the printer's control panel, or the applications for your computer. Using the printer's control panel & See "Network Setting Menu" on page 106. & See also "How to Access the Control Panel Menus" on page 103. Setting Up Your Computers to Use the Printer Make sure you have connected the printer to your network as described on the Start Here sheet. Then follow the steps below for every computer on the network that will print with the B-310N or B510DN. 1. Insert the Software CD-ROM in the CD-ROM drive. With Windows 7 and Windows Vista, if you see the AutoPlay window, click Run Setup.exe. When you see the User Account Control screen, click Continue or Yes. 2. Click Install. Using the Printer on a Network 138
-
 1
1 -
2
-
3
-
4
-
5
-
6
-
7
-
8
-
9
-
10
-
11
-
12
-
13
-
14
-
15
-
16
-
17
-
18
-
19
-
20
-
21
-
22
-
23
-
24
-
25
-
26
-
27
-
28
-
29
-
30
-
31
-
32
-
33
-
34
-
35
-
36
-
37
-
38
-
39
-
40
-
41
-
42
-
43
-
44
-
45
-
46
-
47
-
48
-
49
-
50
-
51
-
52
-
53
-
54
-
55
-
56
-
57
-
58
-
59
-
60
-
61
-
62
-
63
-
64
-
65
-
66
-
67
-
68
-
69
-
70
-
71
-
72
-
73
-
74
-
75
-
76
-
77
-
78
-
79
-
80
-
81
-
82
-
83
-
84
-
85
-
86
-
87
-
88
-
89
-
90
-
91
-
92
-
93
-
94
-
95
-
96
-
97
-
98
-
99
-
100
-
101
-
102
-
103
-
104
-
105
-
106
-
107
-
108
-
109
-
110
-
111
-
112
-
113
-
114
-
115
-
116
-
117
-
118
-
119
-
120
-
121
-
122
-
123
-
124
-
125
-
126
-
127
-
128
-
129
-
130
-
131
-
132
-
 133
133 -
 134
134 -
 135
135 -
 136
136 -
 137
137 -
 138
138 -
 139
139 -
 140
140 -
 141
141 -
 142
142 -
 143
143 -
144
-
145
-
146
-
147
-
148
-
149
-
150
-
151
-
152
-
153
-
154
-
155
-
156
-
157
-
158
-
159
-
160
-
161
-
162
-
163
-
164
-
165
-
166
-
167
-
168
-
169
-
170
-
171
-
172
-
173
-
174
-
175
-
176
-
177
-
178
-
179
-
180
-
181
-
182
-
183
-
184
-
185
-
186
-
187
-
188
-
189
-
190
 |
 |
