Epson C264011 Printer Basics - Page 60
Setting Up Client Systems
 |
UPC - 010343816213
View all Epson C264011 manuals
Add to My Manuals
Save this manual to your list of manuals |
Page 60 highlights
Setting Up Client Systems 1. Click Start, point to Settings, and select Printers. 2. Right-click the EPSON Stylus Photo 1200 icon and choose Properties. 3. Click the Details tab. You see the following dialog box: Details tab Click Add Port, then specify the network path in the dialog box that appears 4. Click the Add Port button, then click Browse to specify the network path to the printer. To print from DOS applications as well as Windows applications, click the Capture Printer Port button instead of Add Port. Select the printer port in the Device list, then specify its network path. Select Reconnect at logon, then click OK. 5. When you return to the Details tab, click OK. 54
-
 1
1 -
2
-
3
-
4
-
5
-
6
-
7
-
8
-
9
-
10
-
11
-
12
-
13
-
14
-
15
-
16
-
17
-
18
-
19
-
20
-
21
-
22
-
23
-
24
-
25
-
26
-
27
-
28
-
29
-
30
-
31
-
32
-
33
-
34
-
35
-
36
-
37
-
38
-
39
-
40
-
41
-
42
-
43
-
44
-
45
-
46
-
47
-
48
-
49
-
50
-
51
-
52
-
53
-
54
-
 55
55 -
 56
56 -
 57
57 -
 58
58 -
 59
59 -
 60
60 -
 61
61 -
 62
62 -
 63
63 -
 64
64 -
 65
65 -
66
-
67
 |
 |

54
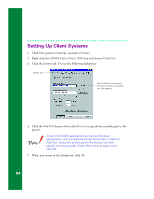
Setting Up Client Systems
1.
Click
Start
, point to
Settings
, and select
Printers
.
2.
Right-click the
EPSON Stylus Photo 1200
icon and choose
Properties
.
3.
Click the
Details
tab. You see the following dialog box:
4.
Click the
Add Port
button, then click
Browse
to specify the network path to the
printer.
To print from DOS applications as well as Windows
applications, click the Capture Printer Port button instead of
Add Port. Select the printer port in the Device list, then
specify its network path. Select Reconnect at logon, then
click OK.
5.
When you return to the Details tab, click
OK
.
Click Add Port, then specify
the network path in the dialog
box that appears
Details tab