Epson Expression 10000XL - Photo Edition User Manual - Page 15
Using the Preview Screen, Thumbnail, Full-size
 |
View all Epson Expression 10000XL - Photo Edition manuals
Add to My Manuals
Save this manual to your list of manuals |
Page 15 highlights
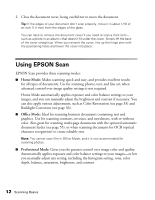
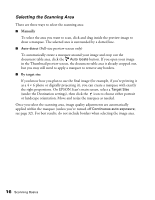
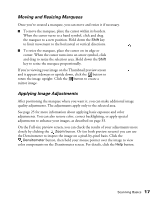
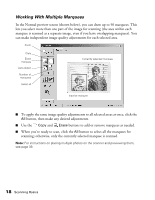
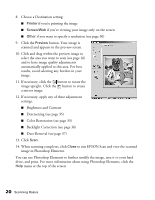
8. Click Scan. 9. When scanning completes, click Close to exit EPSON Scan and view the scanned image in your imaging application. Now you can use your imaging application to further modify the image, save it to your hard drive, or print it. Using the Preview Screen The preview screen lets you select the area of your image you want to scan. You do this by drawing a box (or marquee) around the previewed image. It also lets you make adjustments to your image before scanning. There are two ways to preview images: ■ In the Thumbnail preview screen, EPSON Scan automatically locates and crops the image you've placed on the scanner, and corrects the angle of the image if it's tilted. ■ In the Full-size preview screen, you see the full scanned area (your image plus any white space that's unoccupied on the scanner glass). You can manually select the portion of the image you want to scan, and make any other desired adjustments. To select the Thumbnail preview, click the checkbox below the Preview button. Note: With some modes and settings, this checkbox is grayed-out and you cannot select the Thumbnail option. Your images will open in the Full-size preview screen. When previewing images as thumbnails, EPSON Scan may cut off part of your image if its edges are quite light. In that case, either click the Configuration button on EPSON Scan's main screen and increase the size of the thumbnail cropping area, or preview your image using the Full-size preview screen instead. Scanning Basics 15
-
 1
1 -
2
-
3
-
4
-
5
-
6
-
7
-
8
-
9
-
 10
10 -
 11
11 -
 12
12 -
 13
13 -
 14
14 -
 15
15 -
 16
16 -
 17
17 -
 18
18 -
 19
19 -
 20
20 -
21
-
22
-
23
-
24
-
25
-
26
-
27
-
28
-
29
-
30
-
31
-
32
-
33
-
34
-
35
-
36
-
37
-
38
-
39
-
40
-
41
-
42
-
43
-
44
-
45
-
46
-
47
-
48
-
49
-
50
-
51
-
52
-
53
-
54
-
55
-
56
-
57
-
58
-
59
-
60
-
61
-
62
-
63
-
64
-
65
-
66
-
67
-
68
-
69
-
70
-
71
-
72
-
73
-
74
-
75
-
76
-
77
-
78
-
79
-
80
-
81
-
82
-
83
-
84
-
85
-
86
-
87
-
88
-
89
-
90
-
91
-
92
-
93
-
94
-
95
-
96
 |
 |
