Epson Expression 10000XL - Photo Edition User Manual - Page 18
Working With Multiple Marquees, button, then make any desired adjustments.
 |
View all Epson Expression 10000XL - Photo Edition manuals
Add to My Manuals
Save this manual to your list of manuals |
Page 18 highlights
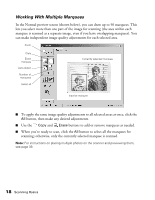
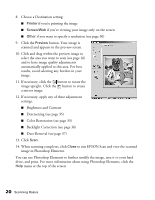
Working With Multiple Marquees In the Normal preview screen (shown below), you can draw up to 50 marquees. This lets you select more than one part of the image for scanning (the area within each marquee is scanned as a separate image, even if you have overlapping marquees). You can make independent image quality adjustments for each selected area. Zoom Copy Erase marquee Auto-detect Number of marquees Select all Currently selected marquee Inactive marquee ■ To apply the same image quality adjustments to all selected areas at once, click the All button, then make any desired adjustments. ■ Use the Copy and Erase buttons to add or remove marquees as needed. ■ When you're ready to scan, click the All button to select all the marquees for scanning; otherwise, only the currently selected marquee is scanned. Note: For instructions on placing multiple photos on the scanner and previewing them, see page 39. 18 Scanning Basics
-
 1
1 -
2
-
3
-
4
-
5
-
6
-
7
-
8
-
9
-
10
-
11
-
12
-
 13
13 -
 14
14 -
 15
15 -
 16
16 -
 17
17 -
 18
18 -
 19
19 -
 20
20 -
 21
21 -
 22
22 -
 23
23 -
24
-
25
-
26
-
27
-
28
-
29
-
30
-
31
-
32
-
33
-
34
-
35
-
36
-
37
-
38
-
39
-
40
-
41
-
42
-
43
-
44
-
45
-
46
-
47
-
48
-
49
-
50
-
51
-
52
-
53
-
54
-
55
-
56
-
57
-
58
-
59
-
60
-
61
-
62
-
63
-
64
-
65
-
66
-
67
-
68
-
69
-
70
-
71
-
72
-
73
-
74
-
75
-
76
-
77
-
78
-
79
-
80
-
81
-
82
-
83
-
84
-
85
-
86
-
87
-
88
-
89
-
90
-
91
-
92
-
93
-
94
-
95
-
96
 |
 |
