Epson Expression 10000XL - Photo Edition User Manual - Page 23
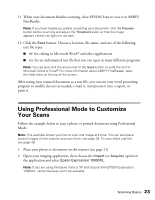
Using Professional Mode to Customize Your Scans
 |
View all Epson Expression 10000XL - Photo Edition manuals
Add to My Manuals
Save this manual to your list of manuals |
Page 23 highlights
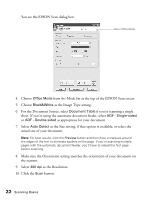
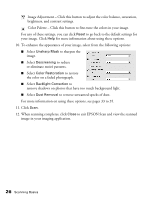
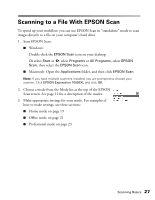
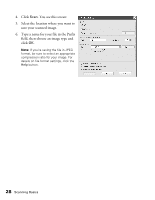
11. When your document finishes scanning, close EPSON Scan to view it in ABBYY FineReader. Note: If you have trouble accurately converting your document, click the Preview button before scanning and adjust the Threshold slider so that the image appears neither too light nor too dark. 12. Click the Save button. Choose a location, file name, and one of the following text file types: ■ rtf: for editing in Microsoft Word® and other applications ■ txt: for an unformatted text file that you can open in many different programs Note: You can also click the arrow next to the Save button to send the text to Microsoft Word or Excel.® For more information about ABBYY FineReader, open the Help menu at the top of the screen. After saving your scanned document as a text file, you can use your word processing program to modify the text as needed, e-mail it, incorporate it into a report, or print it. Using Professional Mode to Customize Your Scans Follow the example below to scan a photo or printed document using Professional Mode. Note: This example shows you how to scan one image at a time. You can also place several images on the scanner and scan them; see page 39. To scan slides and film, see page 48. 1. Place your photo or document on the scanner (see page 11). 2. Open your imaging application, then choose the Import (or Acquire) option in the application and select Epson Expression 10000XL. Note: If you are using Windows Vista or XP and choose WIA-EPSON Expression 10000XL, certain features won't be available. Scanning Basics 23
-
 1
1 -
2
-
3
-
4
-
5
-
6
-
7
-
8
-
9
-
10
-
11
-
12
-
13
-
14
-
15
-
16
-
17
-
 18
18 -
 19
19 -
 20
20 -
 21
21 -
 22
22 -
 23
23 -
 24
24 -
 25
25 -
 26
26 -
 27
27 -
 28
28 -
29
-
30
-
31
-
32
-
33
-
34
-
35
-
36
-
37
-
38
-
39
-
40
-
41
-
42
-
43
-
44
-
45
-
46
-
47
-
48
-
49
-
50
-
51
-
52
-
53
-
54
-
55
-
56
-
57
-
58
-
59
-
60
-
61
-
62
-
63
-
64
-
65
-
66
-
67
-
68
-
69
-
70
-
71
-
72
-
73
-
74
-
75
-
76
-
77
-
78
-
79
-
80
-
81
-
82
-
83
-
84
-
85
-
86
-
87
-
88
-
89
-
90
-
91
-
92
-
93
-
94
-
95
-
96
 |
 |
