Epson Expression 10000XL - Photo Edition User Manual - Page 65
Setting Up EPSON Scan, Enter the Network Image Express Card's
 |
View all Epson Expression 10000XL - Photo Edition manuals
Add to My Manuals
Save this manual to your list of manuals |
Page 65 highlights
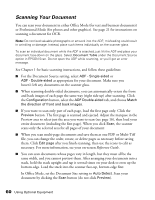
Setting Up EPSON Scan Follow these steps to use the EPSON Scan Settings utility to enable network scanning. 1. Start EPSON Scan Settings: ■ Windows: Click Start or , point to Programs or All Programs, point to EPSON Scan, then select EPSON Scan Settings. ■ Macintosh OS X: Open the Applications folder, open the Utilities folder, then click EPSON Scan Settings. You see this screen: 2. Select your scanner from the Select Scanner list. 3. Select Network as the type of connection. 4. Enter the Network Image Express Card's IP address or host name in the Network Scanner Address field. Using Optional Equipment 65
-
 1
1 -
2
-
3
-
4
-
5
-
6
-
7
-
8
-
9
-
10
-
11
-
12
-
13
-
14
-
15
-
16
-
17
-
18
-
19
-
20
-
21
-
22
-
23
-
24
-
25
-
26
-
27
-
28
-
29
-
30
-
31
-
32
-
33
-
34
-
35
-
36
-
37
-
38
-
39
-
40
-
41
-
42
-
43
-
44
-
45
-
46
-
47
-
48
-
49
-
50
-
51
-
52
-
53
-
54
-
55
-
56
-
57
-
58
-
59
-
 60
60 -
 61
61 -
 62
62 -
 63
63 -
 64
64 -
 65
65 -
 66
66 -
 67
67 -
 68
68 -
 69
69 -
 70
70 -
71
-
72
-
73
-
74
-
75
-
76
-
77
-
78
-
79
-
80
-
81
-
82
-
83
-
84
-
85
-
86
-
87
-
88
-
89
-
90
-
91
-
92
-
93
-
94
-
95
-
96
 |
 |

Using Optional Equipment
65
Setting Up EPSON Scan
Follow these steps to use the EPSON Scan Settings utility to enable network
scanning.
1.
Start EPSON Scan Settings:
■
Windows: Click
Start
or
, point to
Programs
or
All Programs
, point to
EPSON Scan
, then select
EPSON Scan Settings
.
■
Macintosh OS X: Open the
Applications
folder, open the
Utilities
folder,
then click
EPSON Scan Settings
.
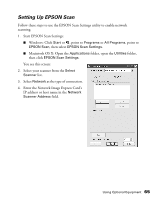
You see this screen:
2.
Select your scanner from the
Select
Scanner
list.
3.
Select
Network
as the type of connection.
4.
Enter the Network Image Express Card’s
IP address or host name in the
Network
Scanner Address
field.