Epson Expression 10000XL - Photo Edition User Manual - Page 39
Batch Scanning Photos and Film, Placing Your Photos
 |
View all Epson Expression 10000XL - Photo Edition manuals
Add to My Manuals
Save this manual to your list of manuals |
Page 39 highlights
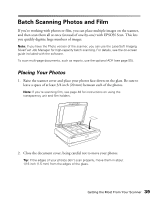
Batch Scanning Photos and Film If you're working with photos or film, you can place multiple images on the scanner, and then scan them all at once (instead of one-by-one) with EPSON Scan. This lets you quickly digitize large numbers of images. Note: If you have the Photo version of the scanner, you can use the LaserSoft Imaging SilverFast Job Manager for high-capacity batch scanning. For details, see the on-screen guide included with the software. To scan multi-page documents, such as reports, use the optional ADF (see page 55). Placing Your Photos 1. Raise the scanner cover and place your photos face-down on the glass. Be sure to leave a space of at least 3/4 inch (20 mm) between each of the photos. Note: If you're scanning film, see page 48 for instructions on using the transparency unit and film holders. 2. Close the document cover, being careful not to move your photos. Tip: If the edges of your photos don't scan properly, move them in about 1/16 inch (1.5 mm) from the edges of the glass. Getting the Most From Your Scanner 39
-
 1
1 -
2
-
3
-
4
-
5
-
6
-
7
-
8
-
9
-
10
-
11
-
12
-
13
-
14
-
15
-
16
-
17
-
18
-
19
-
20
-
21
-
22
-
23
-
24
-
25
-
26
-
27
-
28
-
29
-
30
-
31
-
32
-
33
-
 34
34 -
 35
35 -
 36
36 -
 37
37 -
 38
38 -
 39
39 -
 40
40 -
 41
41 -
 42
42 -
 43
43 -
 44
44 -
45
-
46
-
47
-
48
-
49
-
50
-
51
-
52
-
53
-
54
-
55
-
56
-
57
-
58
-
59
-
60
-
61
-
62
-
63
-
64
-
65
-
66
-
67
-
68
-
69
-
70
-
71
-
72
-
73
-
74
-
75
-
76
-
77
-
78
-
79
-
80
-
81
-
82
-
83
-
84
-
85
-
86
-
87
-
88
-
89
-
90
-
91
-
92
-
93
-
94
-
95
-
96
 |
 |
