Epson LQ-1000 User Manual - Page 20
Replacing the Ribbon., Loading Single-Sheet Paper, Installing the Single-sheet Guide - ink
 |
View all Epson LQ-1000 manuals
Add to My Manuals
Save this manual to your list of manuals |
Page 20 highlights
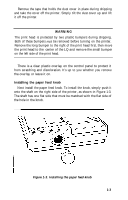
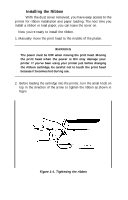
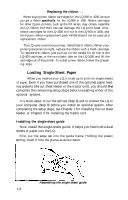
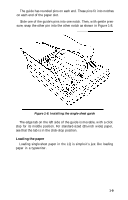
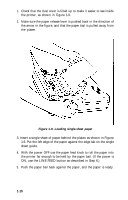
Replacing the ribbon. . . When buying new ribbon cartridges for the LQ-800 or 1000, be sure you get a ribbon specifically for the LQ-800 or 1000. Ribbon cartridges for other Epson printers, such as the FX series, may closely resemble an LQ ribbon, but their use can damage the LQ print head. Also, ribbon cartridges for the LQ-1500 will not fit the LQ-800 or 1000, and the Epson ribbon replacement pack #8758 should not be used as a replacement ribbon. The LQ uses a continuous-loop, inked fabric ribbon. When your printing becomes too light, replace the ribbon with a fresh cartridge. To replace the ribbon, just pull up on the raised fin on top of the LQ-800 cartridge, or the two plastic tabs on the LQ-1000 and lift the cartridge out of the printer. To install a new ribbon, follow the preceding steps. 4 Loading Single-Sheet Paper When you receive your LQ, it is set up to print on single sheets of paper. Even if you have purchased one of the optional paper feeding systems (the cut sheet feeder or the tractor unit), you should first complete the remaining setup steps before installing either of the optional systems. It is much easier to run the self test (Step 8) and to connect the LQ to your computer (Step 9) before you install an optional system. After completing the setup steps, see Chapter 2 for installing the cut sheet feeder, or Chapter 3 for installing the tractor unit. Installing the single-sheet guide Now install the single-sheet guide. It helps you feed individual sheets of paper into the LQ. First, put the edge tab into the guide frame. Holding the plastic spring, insert it into the groove as shown below. Assembling the single-sheet guide 1-8
-
 1
1 -
2
-
3
-
4
-
5
-
6
-
7
-
8
-
9
-
10
-
11
-
12
-
13
-
14
-
 15
15 -
 16
16 -
 17
17 -
 18
18 -
 19
19 -
 20
20 -
 21
21 -
 22
22 -
 23
23 -
 24
24 -
 25
25 -
26
-
27
-
28
-
29
-
30
-
31
-
32
-
33
-
34
-
35
-
36
-
37
-
38
-
39
-
40
-
41
-
42
-
43
-
44
-
45
-
46
-
47
-
48
-
49
-
50
-
51
-
52
-
53
-
54
-
55
-
56
-
57
-
58
-
59
-
60
-
61
-
62
-
63
-
64
-
65
-
66
-
67
-
68
-
69
-
70
-
71
-
72
-
73
-
74
-
75
-
76
-
77
-
78
-
79
-
80
-
81
-
82
-
83
-
84
-
85
-
86
-
87
-
88
-
89
-
90
-
91
-
92
-
93
-
94
-
95
-
96
-
97
-
98
-
99
-
100
-
101
-
102
-
103
-
104
-
105
-
106
-
107
-
108
-
109
-
110
-
111
-
112
-
113
-
114
-
115
-
116
-
117
-
118
-
119
-
120
-
121
-
122
-
123
-
124
-
125
-
126
-
127
-
128
-
129
-
130
-
131
-
132
-
133
-
134
-
135
-
136
-
137
-
138
-
139
-
140
-
141
-
142
-
143
-
144
-
145
-
146
-
147
-
148
-
149
-
150
-
151
-
152
-
153
-
154
-
155
-
156
-
157
-
158
-
159
-
160
-
161
-
162
-
163
-
164
-
165
-
166
-
167
-
168
-
169
-
170
-
171
-
172
-
173
-
174
-
175
-
176
-
177
-
178
-
179
-
180
-
181
-
182
-
183
-
184
-
185
 |
 |
