Epson PowerLite 7800pNL User Manual - Page 57
Controlling the Picture and Sound, Switching Between Picture Sources
 |
View all Epson PowerLite 7800pNL manuals
Add to My Manuals
Save this manual to your list of manuals |
Page 57 highlights
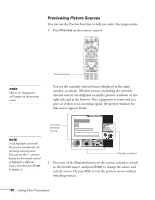
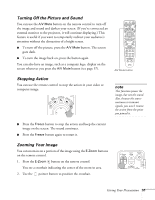
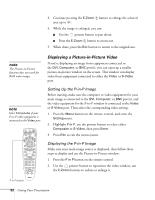
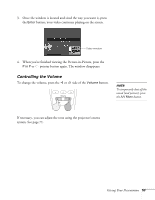
Controlling the Picture and Sound You can use the remote control to preview and select your picture sources, temporarily turn off the picture and sound, freeze the action, zoom in on the picture, display a picture-in-picture image, and adjust the volume. Switching Between Picture Sources If your projector is connected to more than one computer and/or video source, you can switch between the different sources: ■ On the projector's control panel, there are two Source buttons: Press the Computer/DVI button to switch between equipment connected to the Computer and DVI ports. Or press the Video/BNC button to switch between equipment connected to the Video, S-Video, and BNC ports. ■ On the remote control, there are six Source buttons. Use them to switch between equipment connected to the port identified on each button. (The EasyMP button is not functional with the PowerLite 7800p.) Note that the Computer and BNC ports can be set up to use different input signals (for example, Analog RGB or RGB Video)-so if you have equipment connected to one of these ports, it's important to make sure the correct signal is selected to match the equipment you're using. You can change the input signal settings using the projector's menu system; see page 72. After you select a source, the screen goes dark for a moment before the image appears. note You can use the projector's menus to fine-tune the picture and sound quality as described in Chapter 4. Source buttons Giving Your Presentation 49
-
 1
1 -
2
-
3
-
4
-
5
-
6
-
7
-
8
-
9
-
10
-
11
-
12
-
13
-
14
-
15
-
16
-
17
-
18
-
19
-
20
-
21
-
22
-
23
-
24
-
25
-
26
-
27
-
28
-
29
-
30
-
31
-
32
-
33
-
34
-
35
-
36
-
37
-
38
-
39
-
40
-
41
-
42
-
43
-
44
-
45
-
46
-
47
-
48
-
49
-
50
-
51
-
 52
52 -
 53
53 -
 54
54 -
 55
55 -
 56
56 -
 57
57 -
 58
58 -
 59
59 -
 60
60 -
 61
61 -
 62
62 -
63
-
64
-
65
-
66
-
67
-
68
-
69
-
70
-
71
-
72
-
73
-
74
-
75
-
76
-
77
-
78
-
79
-
80
-
81
-
82
-
83
-
84
-
85
-
86
-
87
-
88
-
89
-
90
-
91
-
92
-
93
-
94
-
95
-
96
-
97
-
98
-
99
-
100
-
101
-
102
-
103
-
104
-
105
-
106
-
107
-
108
-
109
-
110
-
111
-
112
-
113
-
114
-
115
-
116
-
117
-
118
-
119
-
120
-
121
-
122
-
123
-
124
-
125
-
126
-
127
-
128
-
129
-
130
-
131
-
132
-
133
-
134
-
135
-
136
-
137
-
138
-
139
-
140
-
141
-
142
-
143
-
144
-
145
-
146
 |
 |
