Epson PowerLite Home Cinema 2040 User Manual - Page 44
Selecting Wireless Network Settings in Windows, Complete, Parent topic, Connect
 |
View all Epson PowerLite Home Cinema 2040 manuals
Add to My Manuals
Save this manual to your list of manuals |
Page 44 highlights
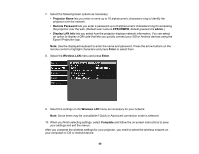
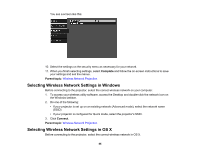
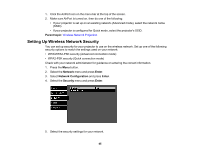
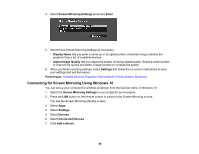
You see a screen like this: 10. Select the settings on the security menu as necessary for your network. 11. When you finish selecting settings, select Complete and follow the on-screen instructions to save your settings and exit the menus. Parent topic: Wireless Network Projection Selecting Wireless Network Settings in Windows Before connecting to the projector, select the correct wireless network on your computer. 1. To access your wireless utility software, access the Desktop and double-click the network icon on the Windows taskbar. 2. Do one of the following: • If your projector is set up on an existing network (Advanced mode), select the network name (SSID). • If your projector is configured for Quick mode, select the projector's SSID. 3. Click Connect. Parent topic: Wireless Network Projection Selecting Wireless Network Settings in OS X Before connecting to the projector, select the correct wireless network in OS X. 44
-
 1
1 -
2
-
3
-
4
-
5
-
6
-
7
-
8
-
9
-
10
-
11
-
12
-
13
-
14
-
15
-
16
-
17
-
18
-
19
-
20
-
21
-
22
-
23
-
24
-
25
-
26
-
27
-
28
-
29
-
30
-
31
-
32
-
33
-
34
-
35
-
36
-
37
-
38
-
 39
39 -
 40
40 -
 41
41 -
 42
42 -
 43
43 -
 44
44 -
 45
45 -
 46
46 -
 47
47 -
 48
48 -
 49
49 -
50
-
51
-
52
-
53
-
54
-
55
-
56
-
57
-
58
-
59
-
60
-
61
-
62
-
63
-
64
-
65
-
66
-
67
-
68
-
69
-
70
-
71
-
72
-
73
-
74
-
75
-
76
-
77
-
78
-
79
-
80
-
81
-
82
-
83
-
84
-
85
-
86
-
87
-
88
-
89
-
90
-
91
-
92
-
93
-
94
-
95
-
96
-
97
-
98
-
99
-
100
-
101
-
102
-
103
-
104
-
105
-
106
-
107
-
108
-
109
-
110
-
111
-
112
-
113
-
114
-
115
-
116
-
117
-
118
-
119
-
120
-
121
-
122
-
123
-
124
-
125
-
126
-
127
-
128
-
129
-
130
-
131
-
132
-
133
-
134
-
135
-
136
-
137
-
138
-
139
-
140
-
141
-
142
-
143
-
144
-
145
-
146
-
147
-
148
-
149
-
150
-
151
-
152
-
153
-
154
-
155
-
156
-
157
-
158
-
159
-
160
-
161
-
162
-
163
-
164
-
165
-
166
-
167
-
168
-
169
-
170
-
171
-
172
-
173
-
174
-
175
-
176
-
177
-
178
-
179
-
180
-
181
-
182
-
183
-
184
-
185
-
186
-
187
-
188
-
189
-
190
-
191
-
192
-
193
-
194
-
195
-
196
-
197
-
198
-
199
-
200
-
201
-
202
-
203
-
204
-
205
-
206
-
207
 |
 |