Epson PowerLite Home Cinema 2040 User Manual - Page 50
Connecting for Screen Mirroring Using Windows 7/Windows 8, Devices, Add a device, Parent topic
 |
View all Epson PowerLite Home Cinema 2040 manuals
Add to My Manuals
Save this manual to your list of manuals |
Page 50 highlights
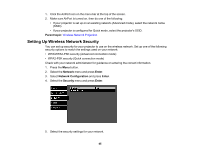
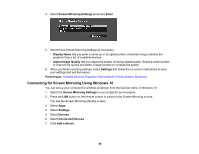
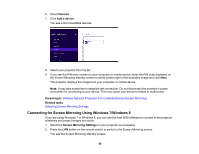
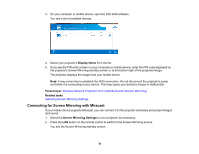
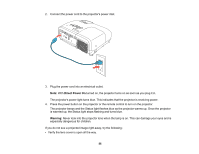
6. Select Devices. 7. Click Add a device. You see a list of available devices. 8. Select your projector from the list. 9. If you see the PIN entry screen on your computer or mobile device, enter the PIN code displayed on the Screen Mirroring standby screen or at the bottom right of the projected image and click Next. The projector displays the image from your computer or mobile device. Note: It may take some time to establish the connection. Do not disconnect the projector's power cord while it is connecting to your device. This may cause your device to freeze or malfunction. Parent topic: Wireless Network Projection from a Mobile Device (Screen Mirroring) Related tasks Selecting Screen Mirroring Settings Connecting for Screen Mirroring Using Windows 7/Windows 8 If you are using Windows 7 or Windows 8, you can use the Intel WiDi software to connect to the projector wirelessly and project images and audio. 1. Select the Screen Mirroring Settings on your projector as necessary. 2. Press the LAN button on the remote control to switch to the Screen Mirroring source. You see the Screen Mirroring standby screen. 50
-
 1
1 -
2
-
3
-
4
-
5
-
6
-
7
-
8
-
9
-
10
-
11
-
12
-
13
-
14
-
15
-
16
-
17
-
18
-
19
-
20
-
21
-
22
-
23
-
24
-
25
-
26
-
27
-
28
-
29
-
30
-
31
-
32
-
33
-
34
-
35
-
36
-
37
-
38
-
39
-
40
-
41
-
42
-
43
-
44
-
 45
45 -
 46
46 -
 47
47 -
 48
48 -
 49
49 -
 50
50 -
 51
51 -
 52
52 -
 53
53 -
 54
54 -
 55
55 -
56
-
57
-
58
-
59
-
60
-
61
-
62
-
63
-
64
-
65
-
66
-
67
-
68
-
69
-
70
-
71
-
72
-
73
-
74
-
75
-
76
-
77
-
78
-
79
-
80
-
81
-
82
-
83
-
84
-
85
-
86
-
87
-
88
-
89
-
90
-
91
-
92
-
93
-
94
-
95
-
96
-
97
-
98
-
99
-
100
-
101
-
102
-
103
-
104
-
105
-
106
-
107
-
108
-
109
-
110
-
111
-
112
-
113
-
114
-
115
-
116
-
117
-
118
-
119
-
120
-
121
-
122
-
123
-
124
-
125
-
126
-
127
-
128
-
129
-
130
-
131
-
132
-
133
-
134
-
135
-
136
-
137
-
138
-
139
-
140
-
141
-
142
-
143
-
144
-
145
-
146
-
147
-
148
-
149
-
150
-
151
-
152
-
153
-
154
-
155
-
156
-
157
-
158
-
159
-
160
-
161
-
162
-
163
-
164
-
165
-
166
-
167
-
168
-
169
-
170
-
171
-
172
-
173
-
174
-
175
-
176
-
177
-
178
-
179
-
180
-
181
-
182
-
183
-
184
-
185
-
186
-
187
-
188
-
189
-
190
-
191
-
192
-
193
-
194
-
195
-
196
-
197
-
198
-
199
-
200
-
201
-
202
-
203
-
204
-
205
-
206
-
207
 |
 |