Epson Stylus Pro 10000 - Photographic Dye Ink Quick Installation Guide - EFI F - Page 26
Installing Printer Files, Installing Fonts
 |
View all Epson Stylus Pro 10000 - Photographic Dye Ink manuals
Add to My Manuals
Save this manual to your list of manuals |
Page 26 highlights
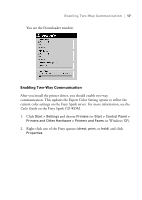
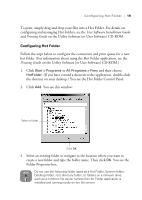
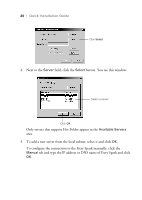
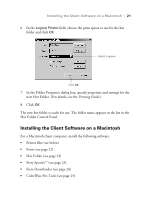
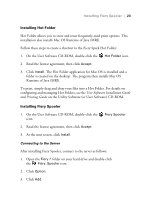
22 | Quick Installation Guide After installing the software, you must enable TCP/IP (see page 26). Before you start, make sure the server has been set up as described on page 5 and is ready. Installing Printer Files To set up the Fiery Spark as a PostScript printer, install the Adobe PostScript printer driver and PPD file that corresponds to your printer. 1. On the User Software CD-ROM, open the English > Printer Driver folder. 2. Double-click the AdobePS 8.7.2 Installer icon. 3. Click Yes to continue with the installation and to confirm that your computer must be restarted after installation. The AdobePS Installer installs the Adobe PostScript printer driver and the PPD file that corresponds to your printer. 4. Click Restart when installation is complete. Installing Fonts The Fonts installer on the User Software CD-ROM includes screen and printer fonts that correspond to the 136 built-in PostScript printer fonts on the Fiery Spark. The Font installer copies both kinds of fonts to the System Folder > Fonts folder on your hard drive. To be available to applications, the screen fonts must remain in this folder. The printer fonts can be copied to a folder of your choice. If you have any applications open, you must quit and relaunch them before the newly installed screen fonts are available. 1. On the User Software CD-ROM, double-click the Fonts icon. 2. At the next screen, click Install. 3. Click Restart when installation is complete.
-
 1
1 -
2
-
3
-
4
-
5
-
6
-
7
-
8
-
9
-
10
-
11
-
12
-
13
-
14
-
15
-
16
-
17
-
18
-
19
-
20
-
 21
21 -
 22
22 -
 23
23 -
 24
24 -
 25
25 -
 26
26 -
 27
27 -
 28
28 -
 29
29 -
 30
30 -
 31
31 -
32
-
33
-
34
 |
 |
