Epson Stylus Pro 3800 Professional Edition Product Information Guide - Page 6
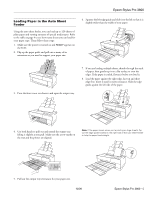
Loading Paper Into the Rear Manual Feed Slot
 |
View all Epson Stylus Pro 3800 Professional Edition manuals
Add to My Manuals
Save this manual to your list of manuals |
Page 6 highlights
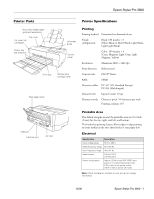
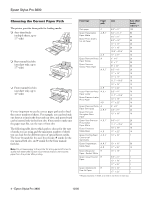
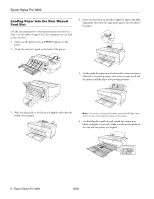
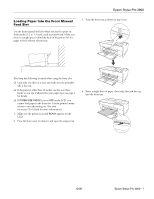
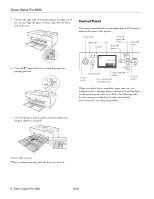
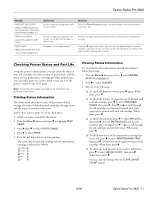
Epson Stylus Pro 3800 Loading Paper Into the Rear Manual Feed Slot Use the rear manual slot to load special media one sheet at a time. (See the table on page 4 for a list of papers you can load in the rear slot.) 1. Make sure the printer is on and READY appears on the LCD. 2. Attach the rear sheet guide to the back of the printer. 4. Insert one sheet face-up and short edge first against the right edge guide, then slide the edge guide against the left edge of the paper. 5. Gently guide the paper into the slot until it meets resistance. Maintain a constant pressure; after a few seconds you'll feel the printer pull the paper into printing position. 3. Slide the edge guide to the left so it is slightly wider than the width of your paper. Note: If you want to remove the paper, press the d Paper feed button on the control panel to back out the sheet. 6. Use both hands to pull out and extend the output tray, lifting it slightly as you pull. Make sure the arrow marks on the tray and the printer are aligned. 6 - Epson Stylus Pro 3800 12/06
-
 1
1 -
 2
2 -
 3
3 -
 4
4 -
 5
5 -
 6
6 -
 7
7 -
 8
8 -
 9
9 -
 10
10 -
 11
11 -
 12
12 -
13
-
14
-
15
-
16
-
17
-
18
 |
 |
