Epson Stylus Pro 3800 Professional Edition Product Information Guide - Page 7
Loading Paper Into the Front Manual Feed Slot, Epson Stylus Pro 3800 - 7
 |
View all Epson Stylus Pro 3800 Professional Edition manuals
Add to My Manuals
Save this manual to your list of manuals |
Page 7 highlights
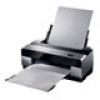
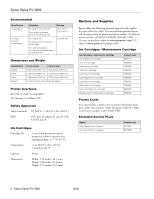
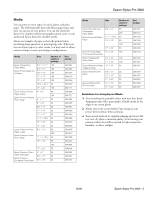
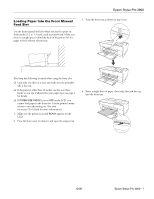
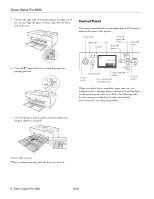
Epson Stylus Pro 3800 Loading Paper Into the Front Manual Feed Slot Use the front manual feed slot when you need to print on thick media (1.2 to 1.5 mm), such as posterboard. Make sure there is enough space behind the back of the printer for the paper to feed without obstruction. 3. Press the front tray as shown to pop it out. Also keep the following in mind when using the front slot: ❏ Load only one sheet at a time and make sure the printable side is face-up. ❏ If the paper is wider than 16 inches, use the auto sheet feeder or rear slot if allowed for your paper type; see page 4 for details. ❏ If PAPER SIZE CHECK is set to OFF on the LCD, you cannot load paper in the front slot. Use the printer's menu system to turn this setting on. (See your on-screen User's Guide for more information.) 1. Make sure the printer is on and READY appears on the LCD. 2. Press the front cover to release it and open the output tray. 4. Insert a single sheet of paper, short edge first and face-up into the front tray. 12/06 Epson Stylus Pro 3800 - 7
-
 1
1 -
 2
2 -
 3
3 -
 4
4 -
 5
5 -
 6
6 -
 7
7 -
 8
8 -
 9
9 -
 10
10 -
 11
11 -
 12
12 -
13
-
14
-
15
-
16
-
17
-
18
 |
 |