Epson Stylus Pro 3800 Professional Edition Product Information Guide - Page 8
Control Panel, indicate the status of the printer.
 |
View all Epson Stylus Pro 3800 Professional Edition manuals
Add to My Manuals
Save this manual to your list of manuals |
Page 8 highlights
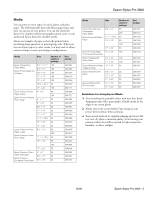
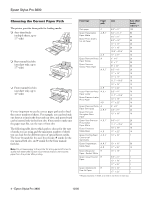
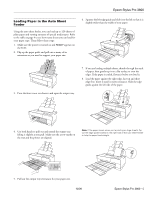
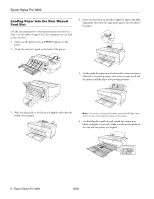
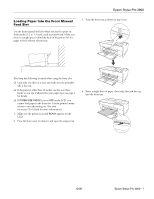
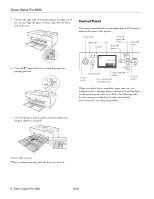
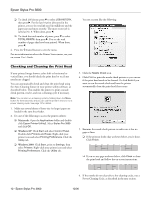
Epson Stylus Pro 3800 5. Position the right edge of the paper against the right side of the tray and align the paper's bottom edge with the white line on the tray. Control Panel The control panel includes various lights and an LCD panel to indicate the status of the printer. Power light Paper light LCD Ink light Ink cover open / u button Back / l button Menu / r button 6. Press the d Paper feed button to feed the paper into printing position. Cancel button Paper feed / d button Power button Ink, maintenance cartridge status Enter button When your ink is low or expended, paper runs out, or a problem occurs, a message appears on the LCD, and the lights on the control panel come on or flash. The following table lists the messages in alphabetical order and includes instructions for correcting the problem. 7. Use both hands to pull out and extend the output tray, lifting it slightly as you pull. You're ready to print. When you finish printing, push the front tray back in. 8 - Epson Stylus Pro 3800 12/06
-
 1
1 -
2
-
 3
3 -
 4
4 -
 5
5 -
 6
6 -
 7
7 -
 8
8 -
 9
9 -
 10
10 -
 11
11 -
 12
12 -
 13
13 -
14
-
15
-
16
-
17
-
18
 |
 |
