Epson Stylus Pro 7000 Printer Guide - Page 27
Reference Guide, driver installation starts automatically. - printer driver
 |
View all Epson Stylus Pro 7000 manuals
Add to My Manuals
Save this manual to your list of manuals |
Page 27 highlights
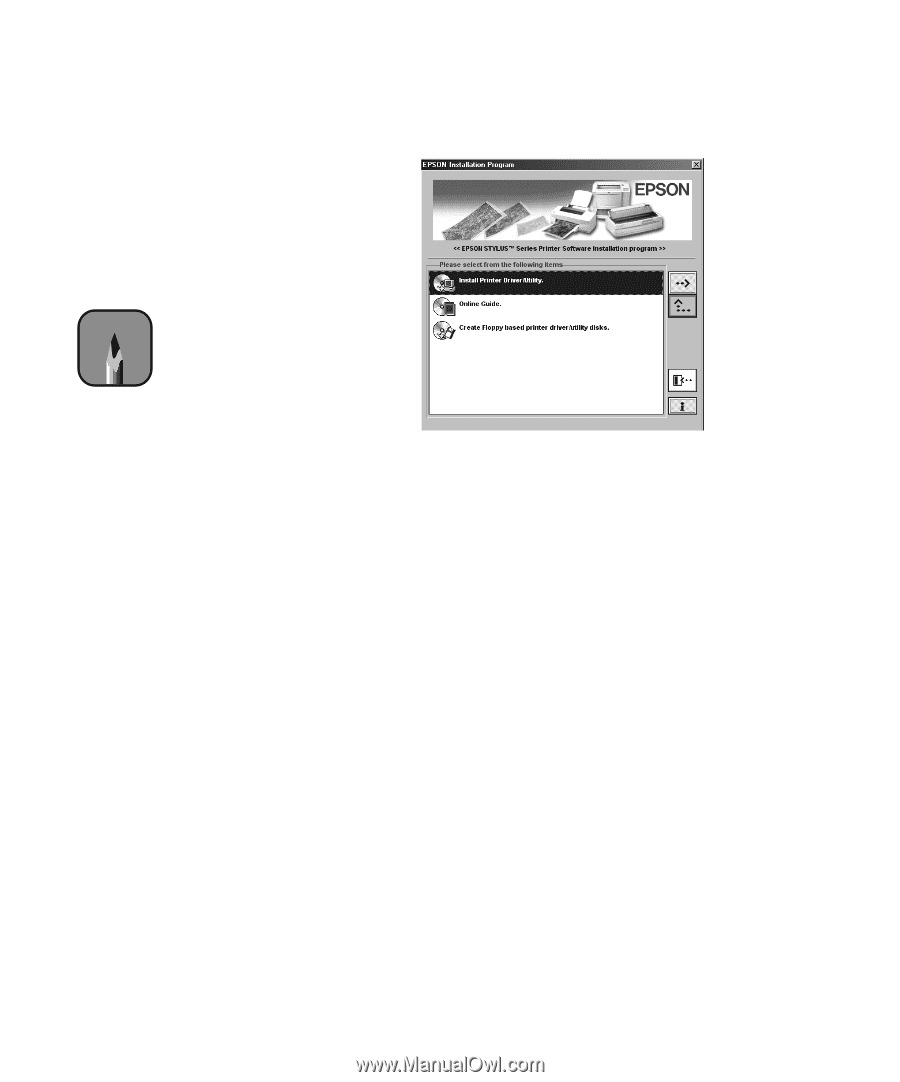
Connecting Your Printer and Installing Drivers | 1-11 The installer starts automatically: Note If the New Hardware Found screen or any other wizard appears, click Cancel and follow the steps given here. If the Digital Signature Not found screen appears (in Windows 2000), click Yes. If it doesn't start, double-click My Computer. Then double-click your CD-ROM icon. 3. Double-click Install Printer Driver/Utility. Then follow the instructions on the screen. 4. If you're using Windows 95 or Windows NT, continue with step 5. If you're using Windows 98 or Windows 2000, follow the on-screen instructions to turn on your printer. The printer port configuration starts automatically. If you're using the USB interface, the USB device driver installation starts automatically. If you see an error message, your drivers may not be installed correctly. For more information, see Chapter 7 in this guide or "Troubleshooting" in the electronic Reference Guide on your printer software CD-ROM. 5. When you see the "installation complete" message, click OK. 1-11
-
 1
1 -
2
-
3
-
4
-
5
-
6
-
7
-
8
-
9
-
10
-
11
-
12
-
13
-
14
-
15
-
16
-
17
-
18
-
19
-
20
-
21
-
 22
22 -
 23
23 -
 24
24 -
 25
25 -
 26
26 -
 27
27 -
 28
28 -
 29
29 -
 30
30 -
 31
31 -
 32
32 -
33
-
34
-
35
-
36
-
37
-
38
-
39
-
40
-
41
-
42
-
43
-
44
-
45
-
46
-
47
-
48
-
49
-
50
-
51
-
52
-
53
-
54
-
55
-
56
-
57
-
58
-
59
-
60
-
61
-
62
-
63
-
64
-
65
-
66
-
67
-
68
-
69
-
70
-
71
-
72
-
73
-
74
-
75
-
76
-
77
-
78
-
79
-
80
-
81
-
82
-
83
-
84
-
85
-
86
-
87
-
88
-
89
-
90
-
91
-
92
-
93
-
94
-
95
-
96
-
97
-
98
-
99
-
100
-
101
-
102
-
103
-
104
-
105
-
106
-
107
-
108
-
109
-
110
-
111
-
112
-
113
-
114
-
115
-
116
-
117
-
118
-
119
-
120
-
121
-
122
-
123
-
124
-
125
-
126
-
127
-
128
-
129
-
130
-
131
-
132
-
133
-
134
-
135
-
136
-
137
-
138
-
139
-
140
-
141
-
142
-
143
-
144
-
145
-
146
-
147
 |
 |