Epson Stylus Pro 7000 Printer Guide - Page 31
Setting Up Printer Sharing in Windows NT 4.0, Setting up your printer as a shared printer
 |
View all Epson Stylus Pro 7000 manuals
Add to My Manuals
Save this manual to your list of manuals |
Page 31 highlights
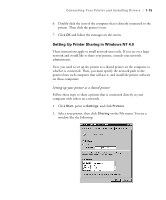
Connecting Your Printer and Installing Drivers | 1-15 6. Double-click the icon of the computer that is directly connected to the printer. Then click the printer's icon. 7. Click OK and follow the messages on the screen. Setting Up Printer Sharing in Windows NT 4.0 These instructions apply to small network users only. If you are on a large network and would like to share your printer, consult your network administrator. First, you need to set up the printer as a shared printer on the computer to which it is connected. Then, you must specify the network path to the printer from each computer that will use it, and install the printer software on those computers. Setting up your printer as a shared printer Follow these steps to share a printer that is connected directly to your computer with others on a network. 1. Click Start, point to Settings, and click Printers. 2. Select your printer, then click Sharing on the File menu. You see a window like the following: 1-15
-
 1
1 -
2
-
3
-
4
-
5
-
6
-
7
-
8
-
9
-
10
-
11
-
12
-
13
-
14
-
15
-
16
-
17
-
18
-
19
-
20
-
21
-
22
-
23
-
24
-
25
-
 26
26 -
 27
27 -
 28
28 -
 29
29 -
 30
30 -
 31
31 -
 32
32 -
 33
33 -
 34
34 -
 35
35 -
 36
36 -
37
-
38
-
39
-
40
-
41
-
42
-
43
-
44
-
45
-
46
-
47
-
48
-
49
-
50
-
51
-
52
-
53
-
54
-
55
-
56
-
57
-
58
-
59
-
60
-
61
-
62
-
63
-
64
-
65
-
66
-
67
-
68
-
69
-
70
-
71
-
72
-
73
-
74
-
75
-
76
-
77
-
78
-
79
-
80
-
81
-
82
-
83
-
84
-
85
-
86
-
87
-
88
-
89
-
90
-
91
-
92
-
93
-
94
-
95
-
96
-
97
-
98
-
99
-
100
-
101
-
102
-
103
-
104
-
105
-
106
-
107
-
108
-
109
-
110
-
111
-
112
-
113
-
114
-
115
-
116
-
117
-
118
-
119
-
120
-
121
-
122
-
123
-
124
-
125
-
126
-
127
-
128
-
129
-
130
-
131
-
132
-
133
-
134
-
135
-
136
-
137
-
138
-
139
-
140
-
141
-
142
-
143
-
144
-
145
-
146
-
147
 |
 |
