Epson Stylus Pro 7000 Printer Guide - Page 28
Checking USB Installation (Windows 98), Setting Up Printer Sharing in Windows 95 and 98 - troubleshooting
 |
View all Epson Stylus Pro 7000 manuals
Add to My Manuals
Save this manual to your list of manuals |
Page 28 highlights
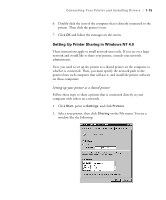
1-12 | Connecting Your Printer and Installing Drivers Checking USB Installation (Windows 98) If you're using a USB connection, it's a good idea to confirm that the driver is set up correctly after you install it. Follow these steps: 1. Click Start, point to Settings, and click Printers. Make sure your EPSON Stylus Pro 7000 icon appears in the Printers window. 2. Right-click the icon, then click Properties. 3. Click the Details tab and note what is displayed under Print to the following port. You should see EPUSBx: (EPSON Stylus Pro 7000). If you don't see the correct port displayed, see Chapter 7 in this guide or "Troubleshooting" in the electronic Reference Guide on your printer software CD-ROM. Setting Up Printer Sharing in Windows 95 and 98 First, you need to set up the printer as a shared printer on the computer to which it is connected. Then, you must specify the network path to the printer from each computer that will use it. Setting up the printer as a shared printer Follow these steps to share a printer that is connected directly to your computer with other computers on a network. 1. Click Start, point to Settings, then click Control Panel. 2. Double-click Network. 3. Click the File and Print Sharing button. You see the following: 1-12
-
 1
1 -
2
-
3
-
4
-
5
-
6
-
7
-
8
-
9
-
10
-
11
-
12
-
13
-
14
-
15
-
16
-
17
-
18
-
19
-
20
-
21
-
22
-
 23
23 -
 24
24 -
 25
25 -
 26
26 -
 27
27 -
 28
28 -
 29
29 -
 30
30 -
 31
31 -
 32
32 -
 33
33 -
34
-
35
-
36
-
37
-
38
-
39
-
40
-
41
-
42
-
43
-
44
-
45
-
46
-
47
-
48
-
49
-
50
-
51
-
52
-
53
-
54
-
55
-
56
-
57
-
58
-
59
-
60
-
61
-
62
-
63
-
64
-
65
-
66
-
67
-
68
-
69
-
70
-
71
-
72
-
73
-
74
-
75
-
76
-
77
-
78
-
79
-
80
-
81
-
82
-
83
-
84
-
85
-
86
-
87
-
88
-
89
-
90
-
91
-
92
-
93
-
94
-
95
-
96
-
97
-
98
-
99
-
100
-
101
-
102
-
103
-
104
-
105
-
106
-
107
-
108
-
109
-
110
-
111
-
112
-
113
-
114
-
115
-
116
-
117
-
118
-
119
-
120
-
121
-
122
-
123
-
124
-
125
-
126
-
127
-
128
-
129
-
130
-
131
-
132
-
133
-
134
-
135
-
136
-
137
-
138
-
139
-
140
-
141
-
142
-
143
-
144
-
145
-
146
-
147
 |
 |
