Epson Stylus Pro 9000 User Manual - Color Calibration - Page 39
choose four suitable steps., shown below. If your sample has more than six total steps
 |
View all Epson Stylus Pro 9000 manuals
Add to My Manuals
Save this manual to your list of manuals |
Page 39 highlights
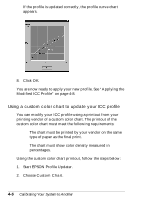
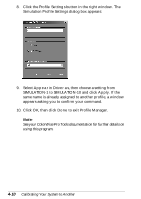
The following dialog box appears: number of steps between 0% and 100% Before measuring the custom chart, you need to enter information about the chart in this dialog box. 4 3. Enter the number of color density steps between 0% and 100% in your chart. If there are four or more steps, type 4. 4. Enter the density percentage for each step in the boxes as shown below. If your sample has more than six total steps, choose four suitable steps. percentage of color density for each step 5. After you finish making the settings, click Apply. 6. Follow the steps under "Preparing to measure the standard color chart" on page 4-1 from step 5. Then follow the steps under "Measuring the chart and updating the profile" on page 4-4 Calibrating Your System to Another 4-7
-
 1
1 -
2
-
3
-
4
-
5
-
6
-
7
-
8
-
9
-
10
-
11
-
12
-
13
-
14
-
15
-
16
-
17
-
18
-
19
-
20
-
21
-
22
-
23
-
24
-
25
-
26
-
27
-
28
-
29
-
30
-
31
-
32
-
33
-
 34
34 -
 35
35 -
 36
36 -
 37
37 -
 38
38 -
 39
39 -
 40
40 -
 41
41 -
 42
42 -
 43
43 -
 44
44
 |
 |
