Epson Stylus Scan 2500 User Manual - Page 158
Uninstalling the EPSON Stylus Scan Software, Uninstalling in Windows (USB Connection)
 |
View all Epson Stylus Scan 2500 manuals
Add to My Manuals
Save this manual to your list of manuals |
Page 158 highlights
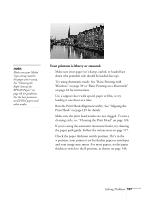
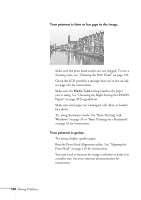
152 Solving Problems Straight lines in the image appear jagged. Make sure the edges of your original document are carefully aligned with the scales on the sides of the document table. The edges of the document are not scanned or copied. Check the position of your original document. Adjust your document's position so that the image is within the glass area. Uninstalling the EPSON Stylus Scan Software If you need to uninstall your EPSON Stylus Scan software, follow the steps for your operating system and type of connection: Uninstalling in Windows (USB Connection) 1. Click Start, point to Programs, EPSON Smart Panel, and click Uninstall EPSON Smart Panel. Then follow the instructions on the screen. 2. Double-click the My Computer icon, then double-click the Control Panel icon. 3. Double-click the Scanners and Cameras icon, select EPSON Stylus Scan 2500, click Remove, then click OK. 4. Double-click Add/Remove Programs, select EPSON Printer Software, then click Add/Remove. 5. Select the EPSON Stylus Scan 2500 printer icon and click OK. Then follow the instructions on the screen. 6. After uninstall is complete, select EPSON USB Printer Devices, click Add/Remove, then follow the instructions on the screen. Your computer restarts automatically. To reinstall your software, follow the instructions on your Start Here sheet.
-
 1
1 -
2
-
3
-
4
-
5
-
6
-
7
-
8
-
9
-
10
-
11
-
12
-
13
-
14
-
15
-
16
-
17
-
18
-
19
-
20
-
21
-
22
-
23
-
24
-
25
-
26
-
27
-
28
-
29
-
30
-
31
-
32
-
33
-
34
-
35
-
36
-
37
-
38
-
39
-
40
-
41
-
42
-
43
-
44
-
45
-
46
-
47
-
48
-
49
-
50
-
51
-
52
-
53
-
54
-
55
-
56
-
57
-
58
-
59
-
60
-
61
-
62
-
63
-
64
-
65
-
66
-
67
-
68
-
69
-
70
-
71
-
72
-
73
-
74
-
75
-
76
-
77
-
78
-
79
-
80
-
81
-
82
-
83
-
84
-
85
-
86
-
87
-
88
-
89
-
90
-
91
-
92
-
93
-
94
-
95
-
96
-
97
-
98
-
99
-
100
-
101
-
102
-
103
-
104
-
105
-
106
-
107
-
108
-
109
-
110
-
111
-
112
-
113
-
114
-
115
-
116
-
117
-
118
-
119
-
120
-
121
-
122
-
123
-
124
-
125
-
126
-
127
-
128
-
129
-
130
-
131
-
132
-
133
-
134
-
135
-
136
-
137
-
138
-
139
-
140
-
141
-
142
-
143
-
144
-
145
-
146
-
147
-
148
-
149
-
150
-
151
-
152
-
 153
153 -
 154
154 -
 155
155 -
 156
156 -
 157
157 -
 158
158 -
 159
159 -
 160
160 -
 161
161 -
 162
162 -
 163
163 -
164
-
165
-
166
-
167
-
168
-
169
-
170
-
171
-
172
-
173
-
174
-
175
-
176
-
177
-
178
-
179
-
180
 |
 |