Epson Stylus Scan 2500 User Manual - Page 99
Click the first tab to start working on your project. Then
 |
View all Epson Stylus Scan 2500 manuals
Add to My Manuals
Save this manual to your list of manuals |
Page 99 highlights
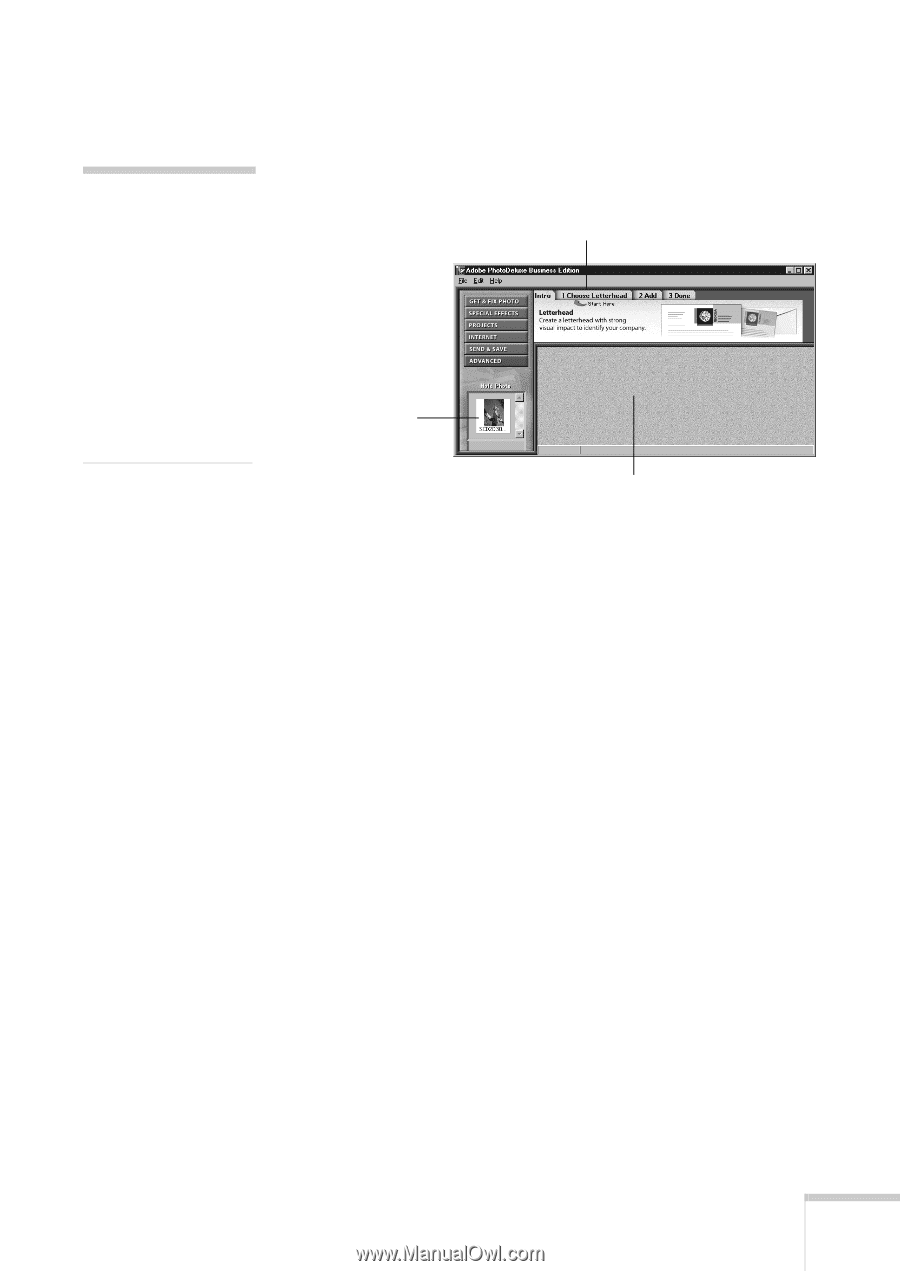
note: Once PhotoDeluxe is open, you can use all of its features to edit and enhance your photo, add text and special effects, or create many types of projects. For more information, click Help or check the electronic manual for PhotoDeluxe, as described on page 7. PhotoDeluxe opens with your scanned image in the Hold Photo area on the left: Click the first tab. Scanned image in Hold Photo area. Work area. 4. Drag your photo to the work area if you want to edit it or add special effects before you begin your project. 5. Click the first tab to start working on your project. Then follow the instructions on the screen to complete the project. Make sure you have your PhotoDeluxe CD-ROM handy so you can insert it when requested. Scanning 93
-
 1
1 -
2
-
3
-
4
-
5
-
6
-
7
-
8
-
9
-
10
-
11
-
12
-
13
-
14
-
15
-
16
-
17
-
18
-
19
-
20
-
21
-
22
-
23
-
24
-
25
-
26
-
27
-
28
-
29
-
30
-
31
-
32
-
33
-
34
-
35
-
36
-
37
-
38
-
39
-
40
-
41
-
42
-
43
-
44
-
45
-
46
-
47
-
48
-
49
-
50
-
51
-
52
-
53
-
54
-
55
-
56
-
57
-
58
-
59
-
60
-
61
-
62
-
63
-
64
-
65
-
66
-
67
-
68
-
69
-
70
-
71
-
72
-
73
-
74
-
75
-
76
-
77
-
78
-
79
-
80
-
81
-
82
-
83
-
84
-
85
-
86
-
87
-
88
-
89
-
90
-
91
-
92
-
93
-
 94
94 -
 95
95 -
 96
96 -
 97
97 -
 98
98 -
 99
99 -
 100
100 -
 101
101 -
 102
102 -
 103
103 -
 104
104 -
105
-
106
-
107
-
108
-
109
-
110
-
111
-
112
-
113
-
114
-
115
-
116
-
117
-
118
-
119
-
120
-
121
-
122
-
123
-
124
-
125
-
126
-
127
-
128
-
129
-
130
-
131
-
132
-
133
-
134
-
135
-
136
-
137
-
138
-
139
-
140
-
141
-
142
-
143
-
144
-
145
-
146
-
147
-
148
-
149
-
150
-
151
-
152
-
153
-
154
-
155
-
156
-
157
-
158
-
159
-
160
-
161
-
162
-
163
-
164
-
165
-
166
-
167
-
168
-
169
-
170
-
171
-
172
-
173
-
174
-
175
-
176
-
177
-
178
-
179
-
180
 |
 |
Scanning
93
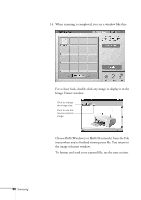
PhotoDeluxe opens with your scanned image in the Hold
Photo area on the left:
4.
Drag your photo to the work area if you want to edit it or
add special effects before you begin your project.
5.
Click the first tab to start working on your project. Then
follow the instructions on the screen to complete the
project.
Make sure you have your PhotoDeluxe CD-ROM handy
so you can insert it when requested.
note:
Once PhotoDeluxe is
open, you can use all of
its features to edit and
enhance your photo, add
text and special effects,
or create many types of
projects. For more
information, click Help
or check the electronic
manual for PhotoDeluxe,
as described on page 7.
Scanned
image in Hold
Photo area.
Work area.
Click the first tab.