Epson SureColor S80600 Quick Reference Guide - Page 35
Tightly seal the lid on the used waste ink bottle.
 |
View all Epson SureColor S80600 manuals
Add to My Manuals
Save this manual to your list of manuals |
Page 35 highlights
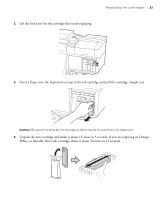
Disposing of waste ink | 35 Caution: Do not remove the waste ink bottle while the printer is performing the following operations unless you are instructed to do so on the LCD screen: printing, head cleaning, head washing, ink refresh, pre-storage maintenance. Before you begin, make sure you read the important safety instructions on page 27 and have a replacement waste ink bottle or an appropriate waste disposal container on hand. 1. Put on plastic gloves, then remove the waste ink bottle from its holder. 2. Insert the waste ink tube into the mouth of the new tank and place the tank in the holder. Caution: Make sure you keep the lid from the waste ink bottle so you can use it when disposing of waste ink. 3. Tightly seal the lid on the used waste ink bottle. 4. Press the OK button, then make sure the new bottle is installed correctly, and press OK again to reset the waste ink counter. 5. Wash your hands thoroughly. Note: Dispose of the waste ink in compliance with industrial waste disposal laws and local government ordinances as required in your area. See page 36 for additional information.
-
 1
1 -
2
-
3
-
4
-
5
-
6
-
7
-
8
-
9
-
10
-
11
-
12
-
13
-
14
-
15
-
16
-
17
-
18
-
19
-
20
-
21
-
22
-
23
-
24
-
25
-
26
-
27
-
28
-
29
-
 30
30 -
 31
31 -
 32
32 -
 33
33 -
 34
34 -
 35
35 -
 36
36 -
 37
37 -
 38
38 -
 39
39 -
 40
40
 |
 |
