Epson WorkForce 500 Quick Guide - Page 23
Selecting Photos From the Screen
 |
View all Epson WorkForce 500 manuals
Add to My Manuals
Save this manual to your list of manuals |
Page 23 highlights
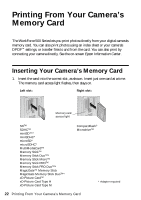
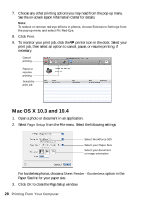
The image files on your card must meet these requirements: File format Image size Number of files JPEG with the Exif version 2.21 standard 80 × 80 pixels to 9200 × 9200 pixels Up to 999 2. To remove the card, make sure the memory card access light is not flashing, then pull the card straight out of its slot. Caution: Do not remove the card or turn off the WorkForce 500 Series while the memory card access light is flashing; you may lose data on the card. Selecting Photos From the Screen 1. Load Epson photo paper. See page 5 for a list. 2. Press the Memory Card button. 3. Press l or r to select View and Print Photos. 4. Press OK. 5. Press l or r to move through your photos and display the one that you want to print. 6. Press + to select the number of copies you want of that photo. 7. To crop the photo, press the Display/Crop button and see page 11 for instructions. 8. Press l or r to view other photos, select the number of copies, and crop, if desired. 9. To print borderless photos on 4 × 6-inch Epson Premium Photo Paper Glossy or Semi-gloss, press x Start. To change your paper type or any of the other print settings, press Menu. Select your settings and press OK. (See page 12 for a list of paper types.) 10. Press x Start to start printing. To cancel printing, press y Stop/Clear Settings. Inserting Your Camera's Memory Card 23
-
 1
1 -
2
-
3
-
4
-
5
-
6
-
7
-
8
-
9
-
10
-
11
-
12
-
13
-
14
-
15
-
16
-
17
-
 18
18 -
 19
19 -
 20
20 -
 21
21 -
 22
22 -
 23
23 -
 24
24 -
 25
25 -
 26
26 -
 27
27 -
 28
28 -
29
-
30
-
31
-
32
-
33
-
34
-
35
-
36
-
37
-
38
-
39
-
40
-
41
-
42
-
43
-
44
-
45
-
46
-
47
-
48
-
49
-
50
-
51
-
52
 |
 |
